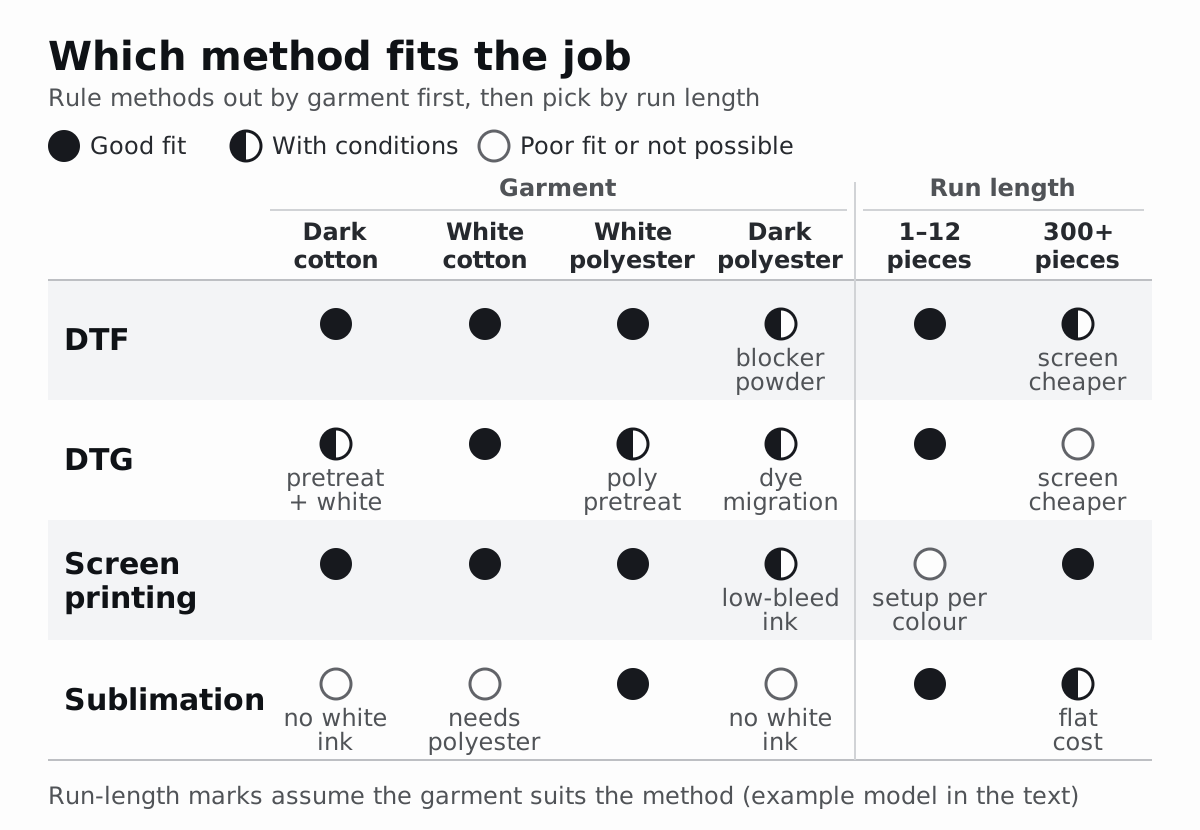
DTF is usually cheapest for short full-colour runs on dark cotton, polyester and blends; DTG wins short runs on white cotton, and sublimation works only on white or light polyester. Screen printing wins once its setup is spread thin: break-even = setup difference ÷ per-piece cost difference. With this guide’s example costs, a one-screen print beats DTF from 39 pieces and a three-colour print on dark shirts, four screens, from 202.
How do DTF, DTG, screen printing and sublimation compare?
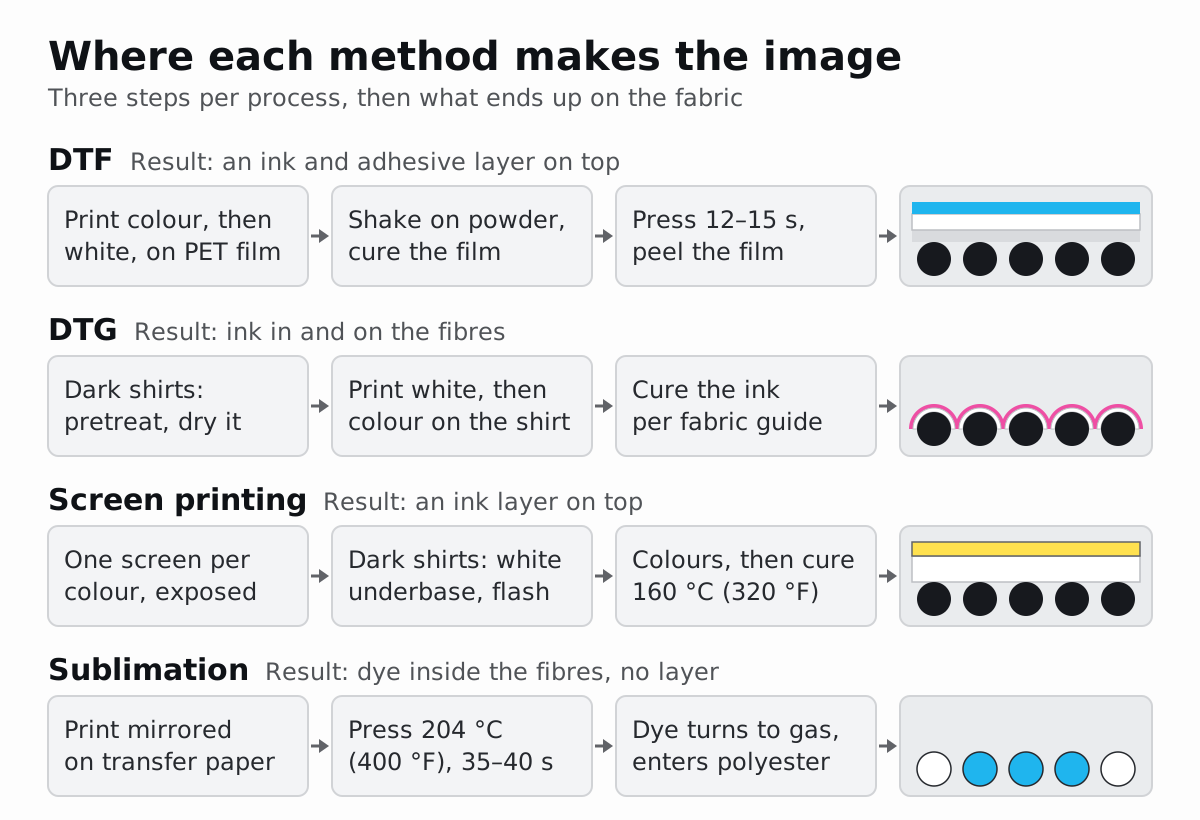
The four methods differ first in where the image is made, and that one fact explains most of the table: which garments they suit, what a new design costs to set up and what each extra piece costs.
| DTF | DTG | Screen printing | Sublimation | |
|---|---|---|---|---|
| Where the image is made | On PET film, then heat-pressed on | On the garment itself | Through a stencil screen, one per colour | On transfer paper, then heat-pressed into the fabric |
| Fabrics | Cotton, polyester, blends, tri-blends; test nylon and coated fabrics first | Best on 100 % cotton; polyester needs its own pretreatment | Almost any, with ink and cure matched to the fabric | Polyester (Custom Ink: at least 65 %) and poly-coated items |
| Dark garments | Yes: a white layer is always printed | Yes, with pretreatment and white ink | Yes, with a white underbase screen and a flash | No: there is no white ink |
| Colours in one design | Unlimited at one price | Unlimited at one price | Each colour adds a screen | Unlimited at one price |
| Setup per design | File preparation | File preparation | Screens, registration and clean-up | File preparation |
| Main cost per piece | Film area, ink, powder, pressing | White ink and pretreatment on dark garments | Labour per print; ink costs cents | Paper, ink and pressing |
| What sits on the fabric | A thin ink-and-adhesive layer | Ink in and on the fibres | An ink layer, thicker with an underbase | No layer: the dye sits inside the fibre |
| Makers’ durability claim | STAHLS’: lab tested for 50+ wash cycles | Brother: AATCC washability 4.0 or greater | Custom Ink: hundreds of washes on cotton | Sawgrass: won’t peel, crack or fade |
| Throughput reference | Transfers print in bulk on a roll; each garment then takes a 12–15 s press | Brother GTXpro: up to 40 dark or 55 light shirts an hour | 400–500 multi-colour prints an hour per operator on an automatic press | 35–40 s in the press per garment |
| Equipment cost, dated sources | $15,000–$40,000 for an in-house line (DTF supplier in Impressions, 2023) | Epson SureColor F2270: $18,995 MSRP (2023) | One-colour manual starter setup $2,500–$5,000 (Lawson, 2025) | Epson SureColor F170: $399 MSRP (2020), plus a heat press |
| Usually wins | Short and medium runs, any garment colour, many designs | Short runs on white cotton, photographic art | Long runs with few colours | White or light polyester |
Read the feel, durability and throughput comparisons as claims: each comes from the maker or decorator named, under its own conditions and without a shared test method, so the fair comparison is your own garments, washed and worn as your customers will. The equipment row mixes two Epson list prices, a screen-printing supplier’s starter budget and a DTF supplier’s estimate, each with its year; dealers, bundles and currencies move all of them.
How does each process work?
DTF (direct to film)
A DTF printer prints the design in colour on a PET carrier film and lays a white layer over it. Hot-melt adhesive powder is shaken onto the wet ink and cured, and the finished transfer is heat-pressed onto the garment before the film is peeled off. Mimaki, which makes DTF printers, describes the same sequence: print on film, sprinkle hot-melt powder, heat it into a transferable ink layer and press that layer onto the fabric.
The white is not optional. Epson’s DTF guide says “the powder will not stick to the film unless White ink is used”, so every DTF transfer carries white, even one going onto a white shirt, and no garment needs pretreatment. Epson cures the powdered film at 170 °C (338 °F) for 150 s in a conveyor oven and presses for 25 s; most film and transfer sheets press for 12–15 s at 150–170 °C (302–338 °F) on cotton. Because the image is finished before it meets the garment, one sheet of film can carry many designs for many orders: a gang sheet.
DTG (direct to garment)
A DTG printer jets water-based pigment ink straight onto the garment. On white or light cotton, DTG can print colour without pretreatment; Epson requires its polyester pretreatment on polyester, even without white ink. Dark garments need white ink under the colour, and white ink needs pretreatment: for cotton, Epson applies about 15 g of solution per A4 or letter-size area and presses it dry at 170 °C (338 °F) for 45 s (45–90 s above A4), and Brother calls pretreatment “necessary for white ink”.
After printing, the ink is heat-cured. Epson specifies 170 °C (338 °F) for 45 s on cotton, extending to 90 s for white beyond A4; on polyester it specifies 130 °C (266 °F) for 30 s with colour or 90 s with white, after fixing the polyester pretreatment at 130 °C for 60 s. Brother’s cited process uses 180 °C (356 °F) for 35 s; follow the instructions for your printer, ink and fabric. Epson recommends 100 % ringspun cotton, or 100 % polyester with its separate polyester pretreatment, and warns that high polyester content gives more subdued colours. Industrial systems such as Kornit’s Atlas MAX Poly apply their fixing step inside the machine; Kornit says this eliminates the need for pretreatment.
Screen printing
Screen printing pushes ink through a mesh stencil with a squeegee, and each colour needs its own screen. Lawson Screen & Digital Products, a screen-printing equipment maker, lists the steps: output each colour separation to film, coat the screen with light-sensitive emulsion, expose and wash it out, clamp it in the press, and flash-cure between colours on multi-colour work.
On dark garments a white underbase goes down first; GRAPHICS PRO describes it as a barrier that stops the dark garment from dulling the colours printed over it. It is flashed only “to touch”, since fully cured plastisol will not take another layer, and the colours print on top. Plastisol then cures at about 160 °C (320 °F) for 30–60 s in a dryer (Lawson). All of that screen work happens once per design and colour, whatever the quantity, which is why screen printing’s cost per piece keeps falling as the run grows.
Sublimation
Sublimation prints the design mirrored, in dye ink, onto transfer paper, and a heat press turns the dye into a gas that enters polyester fibres or a polyester coating. Sawgrass, a sublimation ink and printer maker, describes the paper as built to “hold and release the ink into gas when exposed to heat” and presses polyester fabric at 400 °F (204 °C) for 35–40 s at medium pressure after a 3–5 s pre-press.
The dye becomes part of the fibre, so there is no layer to feel. There is no white ink either: Epson tells makers to stick to white or light-coloured polyester and to avoid cotton and dark fabrics, and Custom Ink, a large decorator, requires at least 65 % polyester.
What does each method cost per print?
Every method splits into a cost you pay once per design and a cost you pay for every piece. That is the order component and piece rate of the per-square-metre pricing guide, applied to four processes:
cost per piece at quantity q = setup ÷ q + variable cost per piece

DTF:          variable = film m² per transfer × film price per m²
                       + design m² × (ink + powder price per m² of design)
                       + labour seconds × rate
DTG:          variable = ink + pretreatment + labour seconds × rate
Screen:       setup    = screens × cost per screen + job setup
              variable = ink per colour × colours + labour seconds × rate
Sublimation:  variable = paper + ink + labour seconds × rate
The table fills those formulas with example inputs. They are round numbers chosen to be plausible and easy to check, not market prices; replace every one with your own. The job is an 11 × 11 in (279.4 mm square, 0.0781 m²) front on a cotton T-shirt, and the blank garment is left out because it costs the same whichever method decorates it, except that sublimation needs a polyester blank.
| Input | Example value | Replace with |
|---|---|---|
| Labour | $20 an hour for every method, so 90 seconds cost $0.50 | Your hourly cost of a trained operator |
| Setup, DTF, DTG and sublimation | 10 minutes of file preparation per design: $3.33 | Your timed prepress |
| DTF film | $1.50 per linear metre of 600 mm film = $2.50 per m²; 0.10 m² per transfer | Roll price ÷ length ÷ width; your own layout |
| DTF ink and powder | $5.00 and $0.50 per m² of design, white included | Your RIP’s ink estimate and the powder you weigh, divided by the area printed |
| DTF labour | 90 seconds per garment: cut, pre-press, press, peel | Timed at your press |
| DTG consumables | Dark shirt: $1.50 of ink plus $0.20 of pretreatment. White shirt: $0.40 of colour ink, no pretreatment | Millilitres from your printer software × your price per millilitre |
| DTG labour | 120 seconds per dark shirt (30 an hour), 90 per white shirt | Shirts you actually finish in an hour |
| Screen setup | $25 per screen plus $10 per job | Your screen-room minutes and materials |
| Screen ink | $0.05 per colour per print; $0.10 for a white underbase or a solid white print | Ink weight per print × price |
| Screen labour, manual press | 45 seconds for 1 screen, 72 for 4 screens with a flash, 48 for 3 screens on a white shirt | Prints per hour on your press |
| Sublimation | $0.20 of paper, $0.50 of ink, 90 seconds at the press | Your sheet and ink cost |
A few of these sit next to published figures. Brother rates the GTXpro at up to 40 dark shirts an hour for an 11 × 11 in design, so 30 an hour leaves time for pretreating and curing. Anatol, a press maker, priced a screen at $30 in a 2017 worked example, before 40 minutes of labour for making and reclaiming it, which is more than the $25 used here. Lawson’s 2025 beginner guide estimates plastisol ink at $0.05 per shirt. In a 2023 Impressions article, a DTF supplier put in-house DTF at under $1 per square foot; the example’s film, ink and powder come to $0.68 per transfer on 0.10 m² (1.08 sq ft), which is $0.63 per square foot.
The arithmetic for 24 pieces, one line per method:
DTF:                 $3.33 ÷ 24 + ($0.25 + $0.39 + $0.04 + $0.50) = $0.14 + $1.18 = $1.32
DTG, dark shirt:     $3.33 ÷ 24 + ($1.50 + $0.20 + $0.67)         = $0.14 + $2.37 = $2.51
Screen, 1 screen:    ($25 + $10) ÷ 24 + ($0.10 + $0.25)           = $1.46 + $0.35 = $1.81
Screen, 4 screens:   (4 × $25 + $10) ÷ 24 + ($0.25 + $0.40)       = $4.58 + $0.65 = $5.23
Sublimation:         $3.33 ÷ 24 + ($0.20 + $0.50 + $0.50)         = $0.14 + $1.20 = $1.34
The four-screen job is a three-colour design on a dark shirt: a white underbase plus three colours. The one-screen job is a white print on a dark shirt, printed, flashed and printed again through the same screen. Across common run sizes, the same inputs give this on a black cotton tee:
| Pieces | DTF | DTG | Screen, 1 screen | Screen, 4 screens |
|---|---|---|---|---|
| 1 | $4.51 | $5.70 | $35.35 | $110.65 |
| 12 | $1.46 | $2.64 | $3.27 | $9.82 |
| 24 | $1.32 | $2.51 | $1.81 | $5.23 |
| 48 | $1.25 | $2.44 | $1.08 | $2.94 |
| 72 | $1.23 | $2.41 | $0.84 | $2.18 |
| 144 | $1.20 | $2.39 | $0.59 | $1.41 |
| 288 | $1.19 | $2.38 | $0.47 | $1.03 |
On white garments DTG drops the pretreatment and the white ink, screen printing drops the underbase, and sublimation becomes possible if the garment is white polyester. The DTF column does not change, because DTF prints its white layer whatever the garment:
| Pieces | DTF | DTG, colour only, white cotton | Screen, 3 screens, white shirt | Sublimation, white polyester |
|---|---|---|---|---|
| 1 | $4.51 | $4.23 | $85.42 | $4.53 |
| 12 | $1.46 | $1.18 | $7.50 | $1.48 |
| 24 | $1.32 | $1.04 | $3.96 | $1.34 |
| 48 | $1.25 | $0.97 | $2.19 | $1.27 |
| 72 | $1.23 | $0.95 | $1.60 | $1.25 |
| 144 | $1.20 | $0.92 | $1.01 | $1.22 |
| 288 | $1.19 | $0.91 | $0.71 | $1.21 |
The model leaves out four costs that each shop knows better than any example:
- Equipment. Add the purchase price ÷ the prints you expect over its life: a $15,000 line written off over 15,000 transfers adds $1.00 to each. The digital methods carry most of this.
- Maintenance ink. Cleaning cycles use ink too: divide the ink you buy by the ink that reaches garments and raise your price per millilitre by that ratio.
- Spoilage. Test prints at screen setup, misregistered shirts, a failed peel: count them against the job that caused them.
- Overheads. Rent, power and sales time belong in the hourly rate, not in one method.
At what quantity does screen printing beat DTF or DTG?
Two methods cost the same per piece where their lines cross. Solve setup_A ÷ q + variable_A = setup_B ÷ q + variable_B for q:
break-even quantity = (setup_A − setup_B) ÷ (variable_B − variable_A)Method A is the one with the bigger setup and the smaller variable cost, which is screen printing in every pair here. Above the break-even it is cheaper per piece; below it the digital method is. If A’s variable cost is not lower, there is no break-even and B is cheaper at every quantity.
For the four-screen job against DTF: ($110.00 − $3.33) ÷ ($1.1794 − $0.6500) = $106.67 ÷ $0.5294 = 201.5, so screen printing is cheaper from the 202nd shirt. For one screen: ($35.00 − $3.33) ÷ ($1.1794 − $0.3500) = $31.67 ÷ $0.8294 = 38.2, so from the 39th. The whole set, with the example inputs:
| Garment | Pair | Setup difference | Variable cost difference | Screen printing cheaper from |
|---|---|---|---|---|
| Black cotton | 1 screen vs DTG | $31.67 | $2.0167 | 16 pieces |
| Black cotton | 1 screen vs DTF | $31.67 | $0.8294 | 39 pieces |
| Black cotton | 4 screens vs DTG | $106.67 | $1.7167 | 63 pieces |
| Black cotton | 4 screens vs DTF | $106.67 | $0.5294 | 202 pieces |
| White polyester | 3 screens vs sublimation | $81.67 | $0.7833 | 105 pieces |
| White, any fibre | 3 screens vs DTF | $81.67 | $0.7627 | 108 pieces |
| White cotton | 3 screens vs DTG, colour only | $81.67 | $0.4833 | 169 pieces |
Two bands hold for every garment in this example: up to 12 pieces each digital method beats each screen job, and from 300 pieces each screen job beats each digital method. The digital pairs have no break-even, because their setups are equal. With these inputs DTF is $1.19 cheaper than DTG on every dark shirt ($2.37 − $1.18), DTG is $0.28 cheaper than DTF on every white cotton shirt ($1.18 − $0.90), and DTF and sublimation on white polyester differ by about $0.02, a tie on cost.
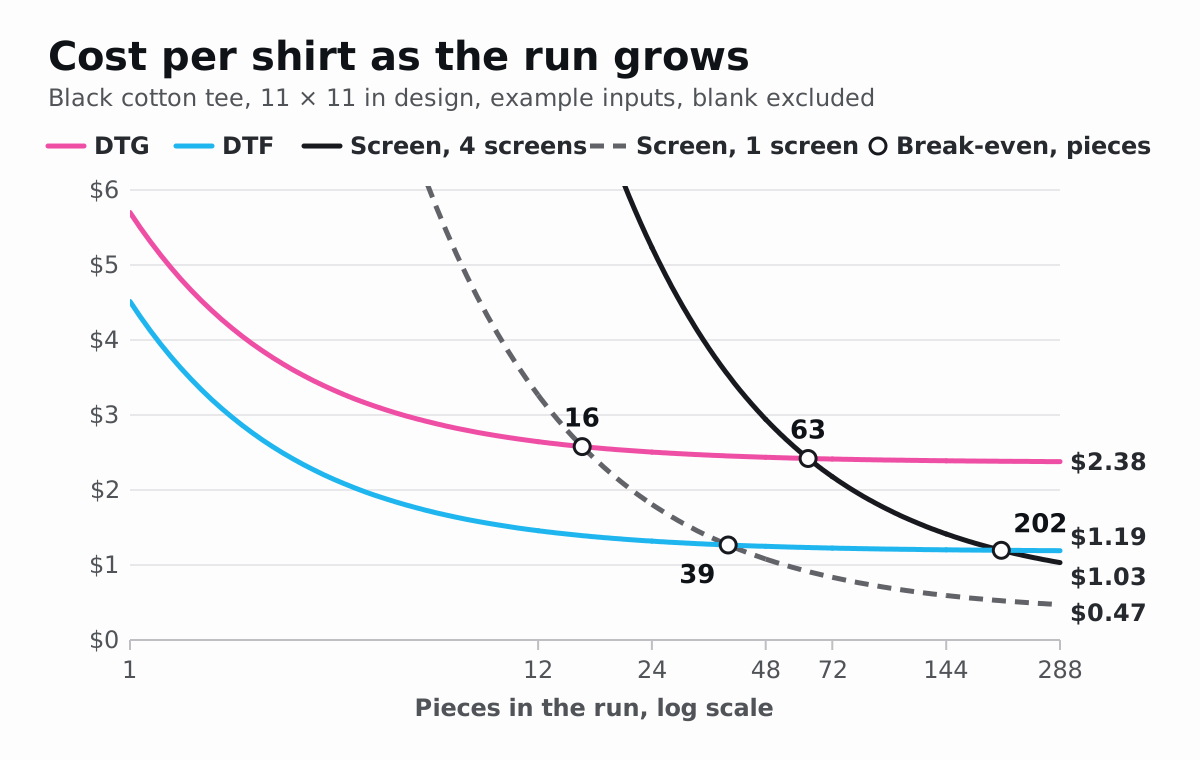
The four-screen break-even against DTF is the fragile one, because the variable costs differ by only $0.53. Small changes in the inputs move it a long way:
- An automatic press. One operator at 450 prints an hour, the middle of the 400–500 that Vastex, a screen-printing equipment maker, quotes in Impressions, cuts the labour to $0.04 a print and the break-even to 121 pieces.
- Anatol’s screen cost. At $30 a screen plus its 40 minutes of labour ($43.33 a screen at $20 an hour), the break-even rises to 341 pieces.
- The DTF layout, covered in the next section, moves it between 144 and 218 pieces.
The one-screen break-even is sturdier: the variable costs differ by $0.83, so even Anatol’s screen cost only moves it from 39 to 61 pieces. That is the same order as the advice of decorators such as Custom Ink, which recommends screen printing from 24 pieces for bold, simple designs.
Why does the gang-sheet layout change DTF’s cost?
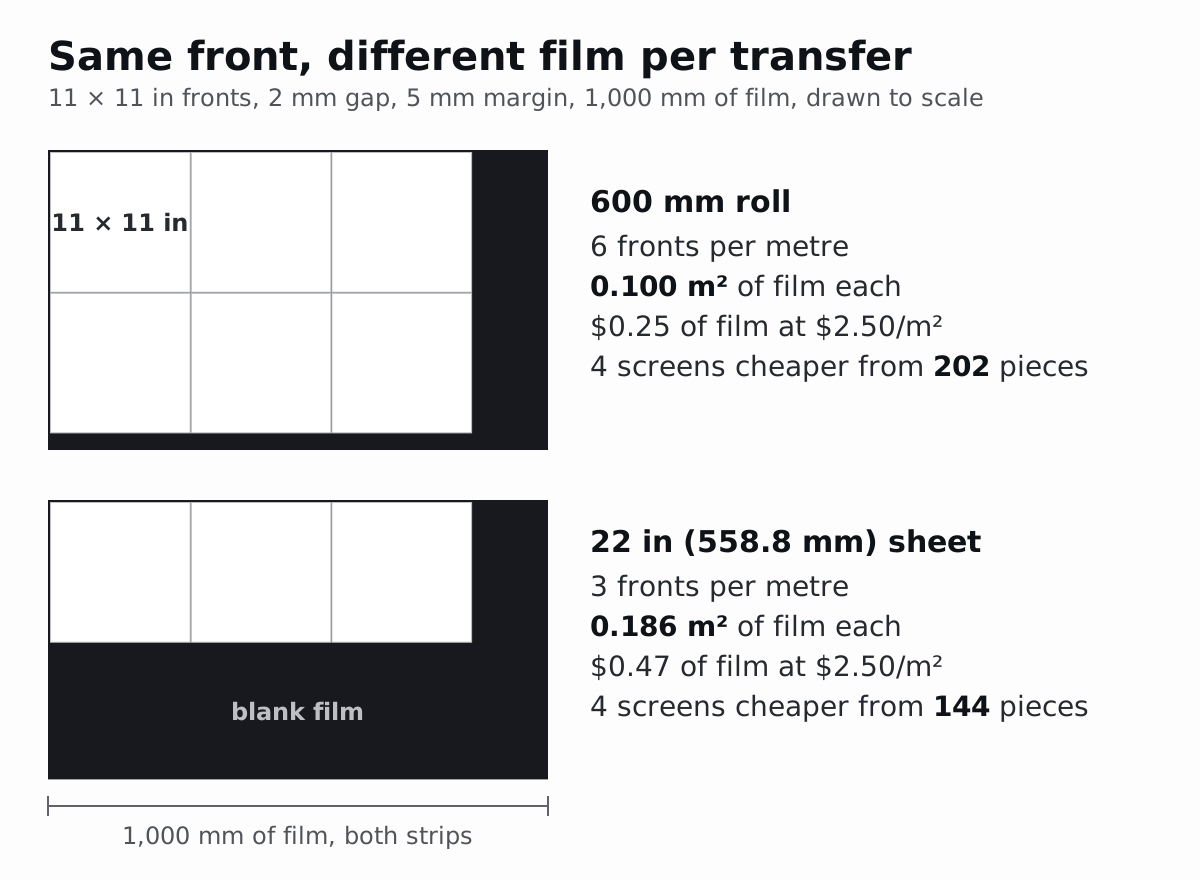
DTF pays for blank space. Film is bought by area, every transfer carries its share of the sheet, and the film between and around the designs is used up as surely as the film under them. So the film term in the DTF formula is a layout figure:
film per transfer = sheet width × used length ÷ transfers on that length
                  = design area ÷ utilisation
Utilisation here is the design rectangles’ share of the film area. Take the DTF transfer size chart’s counts for the 11 × 11 in front, with a 2 mm gap and 5 mm margin:
- 600 mm roll, 1,000 mm sheets: 2 across and 3 rows, so 6 per metre. Film per transfer = 0.6 m × 1.0 m ÷ 6 = 0.100 m², which is 0.0781 m² of design at 78.1 % utilisation.
- 22 in (558.8 mm) sheet: two 11 in fronts need 560.8 mm side by side and the sheet has 548.8 mm between its margins, so 1 fits across and 3 per metre. Film per transfer = 0.5588 m × 1.0 m ÷ 3 = 0.186 m², at 41.9 % utilisation.
- 600 mm roll, one long sheet: the rows repeat every 279.4 + 2 = 281.4 mm, two fronts to a row, so 0.6 m × 0.2814 m ÷ 2 = 0.084 m².
Fed through the example inputs, the layout moves both the DTF cost and every break-even against screen printing:
| Layout of 11 × 11 in fronts | Film per transfer | Film cost at $2.50/m² | DTF cost per piece | 1 screen cheaper from | 4 screens cheaper from |
|---|---|---|---|---|---|
| 22 in sheet, 1 across | 0.186 m² | $0.47 | $1.40 | 31 pieces | 144 pieces |
| 600 mm roll, 1,000 mm sheets | 0.100 m² | $0.25 | $1.18 | 39 pieces | 202 pieces |
| 600 mm roll, one long sheet | 0.084 m² | $0.21 | $1.14 | 41 pieces | 218 pieces |
The same front on the same film costs $0.22 more on the 22 in layout ($0.47 − $0.25), and the four-screen job overtakes DTF 58 pieces sooner. That gap is pure layout: the designs, the film price and the press work are identical. Real orders rarely come in one size, and mixed sizes fill the strips a one-size grid leaves empty, so measure film per transfer on your own sheets rather than trusting a grid. The film savings calculator converts a per-metre film price into a per-m² price and prices what a higher utilisation saves, and the guide to reducing blank DTF film covers the layout decisions in order.
In NestSheet, upload each design as a transparent PNG, set its print size and number of copies, and Auto-nest packs the pieces onto the roll, turning them 0° or 90° so more transfers share each metre of film. A new sheet starts at a 600 mm roll with a 2 mm gap and 5 mm margin, and the bar under the sheet shows the film the layout uses, in metres and m², beside the number of pieces: one division gives this model’s film per transfer. Pack a gang sheet with Auto-nest and read the result before you quote.
DTF vs DTG: which is better?
Garment colour decides most of it. On dark cotton DTG pays for pretreatment and a white layer on every shirt, so DTF costs $1.18 a shirt against DTG’s $2.37 with the example inputs. On white cotton DTG prints colour only, needs no pretreatment by Epson’s account and comes out $0.28 a shirt cheaper, while DTF still prints its white.
Fabric points the same way. Brother calls 100 % cotton ideal for DTG and Epson warns that polyester-rich garments print duller, while STAHLS’ lists cotton, polyester and blends for its DTF transfers. Dyed polyester needs a low-melt or blocker powder under DTF, as the guide to DTF on polyester and dye migration explains.
Feel and wear are claims on both sides. Custom Ink finds digital prints softer and DTF more resistant to abrasion than DTG; Brother rates its ink at AATCC washability 4.0 or greater and STAHLS’ its transfers at 50+ wash cycles, by different tests. Wash both on your own blanks before promising anything. Hybrid printers such as Epson’s SureColor F2270 and Brother’s GTXpro print both ways, so one machine can take each order the cheaper route.
DTF vs screen printing: which is better?
Colour count and run length decide it. Screen printing spends its money before the first shirt, one screen per colour, and then prints for cents; DTF spends almost nothing up front and the same on every piece. With the example inputs one screen beats DTF from 39 pieces, and a four-screen dark-shirt job from 202, or 121 on an automatic press.
Long runs favour screen printing on time as well. Impressions puts a 400-shirt order at up to half a day on a manual press and about an hour on an automatic; at the example’s 90 seconds a garment, 400 DTF shirts need 10 hours at the heat press. Screen printers also mix exact spot colours, and Custom Ink lists Pantone matching among screen printing’s strengths, while DTF builds every colour from CMYK.
DTF wins when orders are small or all different: unlimited colours, gradients and photos at one price, names that change on every shirt, and dozens of designs sharing one gang sheet instead of dozens of screen sets. Both methods leave a layer on top. Custom Ink says plastisol on cotton lasts hundreds of washes and STAHLS’ claims 50+ wash cycles for DTF, so test both on the same blank.
DTF vs sublimation: which is better?
The garment decides before the cost does. Sublimation needs polyester, at least 65 % by Custom Ink’s rule, in white or light colours, because its dye has no white ink to sit on. DTF prints on dark and light, cotton and polyester. On white polyester the two cost almost the same in the example, $1.20 against $1.18, so choose on finish: sublimated dye sits inside the fibre with no layer to feel, and Sawgrass says it won’t peel, crack or fade, while DTF leaves a thin layer on top.
Use sublimation for white or pale polyester sportswear, the team-jersey work Custom Ink reserves it for. Use DTF on dark polyester, cotton and mixed fabrics, with blocker powder on dyed polyester: sublimated fabric is the worst case for dye bleeding into a transfer’s white layer.
Which method wins for common jobs?
Decide in this order: the garment’s fabric and colour rule methods out, then run length and colour count pick between the rest, then feel and durability, tested on your own blanks, settle a close call. The costs below are this guide’s example model, not quotes:
| Job | Usually wins | Example cost per piece, or reason |
|---|---|---|
| One photo shirt, black cotton | DTF | $4.51 against DTG’s $5.70 |
| One photo shirt, white cotton | DTG | $4.23 against DTF’s $4.51, and no pretreatment |
| 24 tees, white logo on black | DTF | $1.32 against one screen’s $1.81 |
| 150 tees, white logo on black | Screen printing | $0.58 against DTF’s $1.20 |
| 100 tees, three colours on black | DTF | $1.21 against four screens’ $1.75 |
| 500 tees, three colours on black | Screen printing | $0.87 against DTF’s $1.19 |
| 50 white polyester running shirts | Sublimation or DTF | $1.27 and $1.25: decide on feel |
| Dark polyester performance tees | DTF | Sublimation has no white; test a blocker powder first |
| 30 designs, 2 of each | DTF | One gang sheet instead of 30 sets of screens |
| Caps, shoes and other awkward items | DTF | Epson notes that DTF transfers reach uniquely shaped items such as shoes and hats |
How do you work out your own break-even?
- Time the labour. Run ten pieces of each method you own, from loading to folding, and divide by ten. Seconds per piece × hourly cost ÷ 3,600 is the labour term.
- Measure consumables per piece. For DTF, take the film area of a real nested sheet and divide it by the transfers on it; read ink from your RIP or printer software’s estimate; weigh powder and screen ink before and after a run.
- Time the setup per design: prepress for the digital methods; making, registering, cleaning and reclaiming each screen.
- Fill in the formulas above for each method and quantity you quote, and compute setup difference ÷ variable cost difference for every pair you can actually run.
- Plan equipment you do not own with its purchase price ÷ expected prints added to the variable cost; the guide to starting a DTF printing business lists what a DTF line needs.
- Confirm on the next real job. Record actual minutes and materials, compare them with the model’s cost per piece, and correct whichever input caused the difference before the next quote.
Sources
- Epson, DTF Film Printing Guide (CMP0437-00 EN): https://download.epson-europe.com/pub/download/6587/epson658728eu.pdf
- Epson, SureColor F2270 User’s Guide and FAQ Do I need to pre-treat every garment that I print on?: https://files.support.epson.com/docid/cpd6/cpd63670.pdf ; https://epson.com/faq/SPT_SCF2270SE~faq-0000b47-scf2270?faq_cat=faq-topFaqs
- Epson news releases, SureColor F2270 availability and price (6 September 2023) and SureColor F170 desktop dye-sublimation printer (12 November 2020): https://news.epson.com/news/surecolor-f2270-hybrid-printer-available ; https://news.epson.com/news/surecolor-f170-desktop-dye-sublimation
- Epson, Sublimation printers for beginners and small business: https://epson.com/sublimation-printers-for-makers
- Brother, GTXpro brochure and DTG FAQs: https://brotherdtg.com/downloads/gtxpro/GTXpro-Brochure.pdf ; https://brotherdtg.com/why-dtg/faqs/
- Kornit Digital, Atlas MAX Poly: https://www.kornit.com/printer/atlas-max-poly/
- Mimaki, TxF150-75 DTF printer: https://mimaki.com/product/inkjet/dtf/txf150-75/
- Sawgrass, SubliJet sublimation inks, Sublimation heat press settings quick reference and The secrets of sublimation: https://www.sawgrassink.com/sublijet/ ; https://www.sawgrassink.com/wp-content/uploads/2023/07/Sublimation-HeatPress-Settings.pdf ; https://www.sawgrassink.com/blog/the-secrets-of-sublimation-a-guest-blog-from-studio-kado/
- Lawson Screen & Digital Products, Screen printing FAQ for beginners: tips, equipment, supplies and costs for 2025 (13 October 2025): https://lawsonsp.com/blogs/education-and-training/screen-printing-faq-for-beginners-essential-tips-equipment-supplies-costs-for-2025
- GRAPHICS PRO, The flash: understanding flash cure basics for your printing (30 October 2018): https://graphics-pro.com/feature/the-flash-understanding-flash-cure-basics-for-your-printing/
- Anatol, Calculating the cost of business at your screen printing shop (10 July 2017): https://anatol.com/calculating-the-cost-of-business-at-your-screen-printing-shop/
- Impressions, The nuts and bolts of direct-to-film (DTF) apparel decorating (23 March 2023): https://impressionsmagazine.com/build-your-business/the-nuts-bolts-of-dtf/38142/
- Impressions, Finding the right screen-printing press for your custom-apparel business (20 March 2024) and Upgrading to an auto press (21 July 2021): https://impressionsmagazine.com/process-technique/finding-the-right-screen-printing-press-t-shirts-custon-decorated-apparel/40897/ ; https://impressionsmagazine.com/process-technique/upgrading-to-an-auto-press/34973/
- Custom Ink, Screen printing vs. digital printing vs. sublimation: a buyer’s guide (15 May 2026): https://www.customink.com/blog/screen-printing-vs-digital-printing-vs-sublimation-a-buyers-guide/
- STAHLS’, UltraColor MAX DTF transfers: https://www.stahls.com/ultracolor-max-transfers