Film and transfer makers publish DTF settings of 150–170 °C (302–338 °F) for cotton and 140–150 °C (284–302 °F) for polyester, mostly 12–15 seconds at medium pressure with standard adhesive powder; Epson’s guide asks for 25 seconds, and Ninja presses every fabric at 154–160 °C (310–320 °F). The film decides the peel: hot-peel film comes off immediately, cold-peel film once it reaches room temperature. Your supplier’s sheet overrides any chart.
DTF heat press settings at a glance
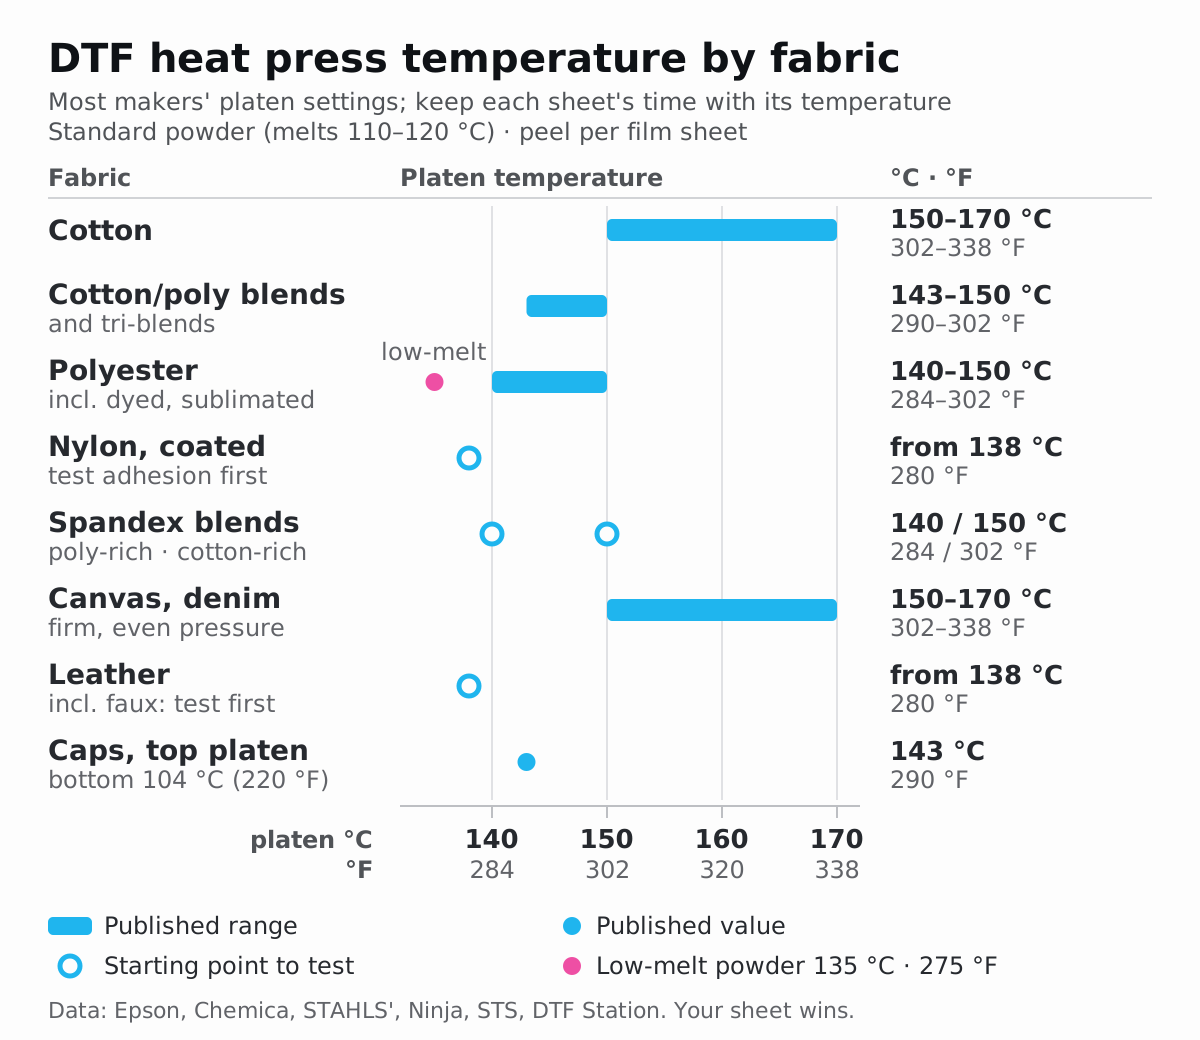
The table condenses the makers’ settings compared in the next section. It assumes standard hot-melt powder (melting at about 110–120 °C) and the peel type on your film’s sheet. The ranges cover hot-peel and cold-peel films alike: in these sheets the peel type changes the dwell and the moment you peel, not the temperature band. Each temperature is what the platen surface must actually reach, so verify it rather than trusting the display. Take the time from the same sheet as the temperature; the makers’ table below lists each pair.
| Fabric | Platen temperature | Time (most sheets) | Pressure | Peel | Use another setting when… |
|---|---|---|---|---|---|
| 100 % cotton | 150–170 °C (302–338 °F) | 12–15 s | Medium (Ninja Transfers: medium-high) | As the film sheet says | The cotton is coated or treated (water-repellent, waxed): test first |
| Cotton/polyester blends, tri-blends | 143–150 °C (290–302 °F) | 12–15 s | Medium | As the film sheet says | The blend is mostly polyester and dark: use the polyester row |
| 100 % polyester, incl. dyed and sublimated | 140–150 °C (284–302 °F) | 12–15 s | Medium | As the film sheet says | The fabric bleeds dye: low-melt or blocker powder at its lowest setting (STS P-6: 135 °C, 275 °F) |
| Nylon and coated fabrics | Start at 138 °C (280 °F) | 12–15 s | Medium; reduce first if it shines | As the film sheet says | Water beads on the surface: coating may block adhesion — test |
| Spandex/Lycra blends (e.g. 95/5 cotton/spandex) | Low end of the main fibre’s row: 150 °C (302 °F) cotton, 140 °C (284 °F) polyester | 12–15 s | Medium | As the film sheet says | Stretch matters: use a stretch-rated (flex) powder |
| Canvas and denim, canvas totes | As cotton: 150–170 °C (302–338 °F) | 12–15 s | Firm, even | As the film sheet says | Rivets, seams or pockets under the print: use a pressing pad |
| Leather and faux leather | Test only; start at 138 °C (280 °F) | Start at 12 s | Light to medium | As the film sheet says | The film or powder sheet does not list leather: do not sell it untested |
| Caps (hat press, curved lower platen) | Top 143 °C (290 °F), bottom 104 °C (220 °F) | 12–15 s | Medium | Hot (STAHLS’ cap chart) | Your transfer sheet gives cap settings: use those |
| Tote bags | By fabric: cotton canvas as canvas, polyester as polyester | 12–15 s | As its fabric row | As the film sheet says | PVC-coated or vinyl bags: do not heat-press; polypropylene: follow the bag maker’s instructions |
Conversions use °F = °C × 9/5 + 32 (and the reverse), rounded to the nearest degree, always from the unit the maker published. STAHLS’ (US), Hotronix, Ninja and STS publish in °F, so their °C values can be 1 °F off if you convert them back. Temperature differences convert by 5/9 only (a 20 °F gap is an 11 °C gap).
Why do DTF heat press settings differ between suppliers?
A DTF (direct-to-film) transfer is printed colour and white ink on a PET carrier film, coated with hot-melt adhesive powder and cured. The press has two jobs: melt that adhesive into the fabric, and leave the film ready to let go of the ink when you peel. Five things move the right setting:
- Adhesive powder. DTF powders are commonly thermoplastic polyurethane (TPU), sold in different melt grades: DTF Station lists its Color Prime Flex at 110–120 °C (230–248 °F), STS its P-6 low-migration powder at 80–95 °C (176–203 °F). Heat from the platen has to cross the 75 µm carrier (Chemica’s film thickness) and the ink before it reaches the adhesive, one reason press settings sit 30–60 °C above a standard powder’s melt range (150–170 °C against 110–120 °C).
- Film release coating. The coating fixes the peel type and often the dwell, the time the press stays closed. Chemica presses its instant-peel 5901 film and its cold-peel 5900 film at the same 150 °C (302 °F), for 12 and 15 seconds.
- Fabric. Heat-sensitive fibres and polyester dyes pull the setting down. Epson specifies 170 °C (338 °F) for cotton and 140 °C (284 °F) for polyester, 30 °C apart; STAHLS’ uses 163 °C (325 °F) and 143 °C (290 °F), 20 °C apart.
- Press. STAHLS’ states that its settings are for its own Hotronix presses and that other presses may need different ones. Its test-kit sheet warns that a low-quality press set to 360 °F (182 °C) can run 20 °F (11 °C) cooler between heating elements or at the edges.
- Ink load. Epson’s guide lists the amount of ink used among the conditions that change temperature and time.
What the makers themselves publish:
| Published by | Product and type | Cotton | Polyester | Time | Pressure | Peel |
|---|---|---|---|---|---|---|
| Epson, DTF Film Printing Guide | Its DTF-capable garment printers, commercial film and powder | 170 °C (338 °F) | 140 °C (284 °F) | 25 s, then a 5 s fixing press | 4.2 N/cm² | As the film’s instructions say |
| Chemica 5901 | Instant-peel film | 150 °C (302 °F) | 150 °C (302 °F) | 12 s | Medium | Instant |
| Chemica 5900 | Cold-peel film | 150 °C (302 °F) | 150 °C (302 °F) | 15 s | Medium | Cold |
| STAHLS’ UltraColor MAX | Finished hot-peel transfers, Hotronix presses | 163 °C (325 °F) | 143 °C (290 °F)* | 12–15 s | Medium | Hot |
| Ninja Transfers | Finished transfers | 154–160 °C (310–320 °F) | Same | 12 s, then a ~12 s second press | Medium-high | After 5 s, hot or cool |
| STS P-6 powder | Low-melt powder, melts 80–95 °C | 163 °C (325 °F) | 135 °C (275 °F) | 15 s | Not stated | Not stated |
*STAHLS’ prints 290 °F as 145 °C; the exact conversion is 143 °C.
The spread is real but bounded: 150–170 °C (302–338 °F) for cotton and 135–160 °C (275–320 °F) for polyester, the lowest value belonging to a low-melt powder and the highest to Ninja. Each row is one recipe: keep its temperature and time together. Generic charts on reseller blogs rarely name a film or powder; treat them as starting guesses at best.
The rule: take the complete set (temperature, time, pressure, peel) from one sheet: the film’s, the powder’s or the transfer maker’s. If film and powder come from different makers and their sheets disagree, press one test transfer at each setting on the target garment and keep the one that passes the checks at the end of this guide. Geo Knight’s press manual says the same: always follow the transfer supplier’s instructions.
What temperature, time and pressure for each fabric?
The table at the top gives the numbers; here are the reasons, for garments that do not fit a row cleanly.
Cotton
Cotton takes the top of the range. It holds moisture, which spends heat in the first seconds of the press, so pre-press it unless your transfer maker says otherwise. On heavy hoodies and fleece, raise pressure before temperature when edges lift.
Cotton/polyester blends and tri-blends
STAHLS’ sets everything that is not 100 % cotton, blends and tri-blends included, to 143 °C (290 °F); Chemica lists polycotton at its standard 150 °C (302 °F). If polyester is the larger share and the colour is dark, the dye risk below applies, so start from the polyester row.
100 % polyester, including dyed and sublimated fabric
Polyester gets the lower settings. On dyed or sublimated polyester the larger risk is dye migration, where dye from the fabric moves into the white ink and tints it. STAHLS’ states that its transfers do not prevent it; STS sells its P-6 powder for low dye migration and presses it on polyester at 135 °C (275 °F). Use the lowest setting your powder allows and a low-melt or blocker powder on fabrics that bleed; the polyester and dye-migration guide covers the mechanism and the tests.
Nylon and coated fabrics
None of the film sheets compared above lists nylon, and STAHLS’ compatibility list stops at cotton, polyester, blends and tri-blends. Ninja’s pressing guide includes nylon and windbreakers, but its scorch guide ranks nylon with water-resistant treatments among the worst materials, because the treatment “may not allow the transfer to adhere properly”. Start at Ninja’s delicate-fabric setting, 138 °C (280 °F), on an inside hem or a spare garment, and test adhesion before quoting the job.
Spandex and Lycra blends
Elastane (spandex, Lycra) gives stretch that a thick print layer may not follow, and Ninja warns that high-elastane fabrics “can melt or lose their stretch properties” under heat. Press at the low end of the main fibre’s row: 150 °C (302 °F) for cotton-rich blends, 140 °C (284 °F) for polyester-rich ones. Use a powder sold for stretch, such as DTF Station’s Color Prime Flex, which its maker describes as giving “superior stretchability” on stretchy fabrics. Once cool, stretch the print as far as the garment stretches in wear; hairline cracks mean the powder or the setting is wrong.
Canvas, denim and tote bags
Canvas and denim are cotton and take cotton temperatures; Ninja’s pressing guide lists denim, twill and canvas. The weave is coarse and the items thick, so the adhesive has to be pushed into the valleys of the weave: use firm, even pressure, pre-press flat, and lift the print area on a pad when rivets, pockets or seams would hold the platen up. A tote follows its fabric, with one exception: Ninja lists vinyl and PVC-coated fabrics among those that “can melt or release harmful fumes”, and non-woven polypropylene shoppers are a plastic too. Do not heat-press PVC-coated or vinyl bags. For polypropylene bags, get the bag maker’s heat-transfer instructions before testing one.
Leather and faux leather
Ninja places both among the worst materials to press: heat can discolour, warp or melt them. DTF Station lists PU (polyurethane, the material of PU faux leather) among the materials for its Flex powder, so a sheet that names your material is the starting point. Treat every leather job as a test: an offcut first, 138 °C (280 °F) for 12 seconds at light to medium pressure, then a bend and scratch check once cool.
Caps and hats
A structured cap’s front panels are curved, so they need a hat press whose lower platen matches the crown. Hotronix’s chart for its 360 IQ hat press gives STAHLS’ UltraColor MAX transfers 143 °C (290 °F) top heat and 104 °C (220 °F) bottom heat for 12–15 seconds at medium pressure, hot peel, with no cover pad. A flat press only suits caps whose panel lies flat without creasing. Placement and maximum cap print sizes are in the DTF transfer size chart.
How much pressure do DTF transfers need, and what does psi mean?
Medium: STAHLS’ and Chemica say medium, Ninja medium-high, and Epson gives a figure, 4.2 N/cm². GRAPHICS PRO’s guide for decorators translates the words into feel and gauge readings (the first three columns; the last shows where this guide uses each):
| Pressure | Hand-operated press | Air-operated press gauge | Typical DTF use |
|---|---|---|---|
| Light | Closes easily with one hand | 25–30 psi | Delicate or coated fabrics as a starting point |
| Medium | Closes with two hands and some effort | 32–38 psi | Most transfer and film sheets |
| Firm | Hard to close with two hands and a lot of muscle | 40 psi or more | Canvas, denim, re-pressing a lifted edge |
A psi figure is only useful if you know what it measures. On an air-operated press the gauge shows regulated air pressure: Geo Knight’s manual for its DK20SP says the regulator and gauge, not the platen height, set the pressure. The force that air produces is spread over the whole platen. Geo Knight rates the DK20SP at 3,000 lb maximum force on a 16 × 20 in platen with a 20–100 psi gauge, so at full force the pressure averaged over the whole platen is:
3,000 lb ÷ (16 in × 20 in) = 3,000 ÷ 320 = 9.4 psi on the platenEpson’s figure is pressure on the garment itself:
4.2 N/cm² = 42,000 Pa; 42,000 ÷ 6,895 Pa per psi = 6.1 psiSo a “medium 32–38 psi” gauge reading and Epson’s 6.1 psi are different measurements, not a contradiction. The same air setting also gives a higher pressure on a smaller platen, because the force is spread over less area. Record pressure per press and per platen, never as a universal number.
In practice:
- Start from the word on your sheet, usually medium.
- Run the paper-pull test described below until the pressure is even and firm enough.
- Write down the knob position or readout that passed, for that press and platen.
- When edges lift, raise pressure first, as Ninja does when it re-presses a lifted design; when the fabric shines or scorches, reduce pressure first, which is Ninja’s advice for scorch marks.
Should you pre-press the garment?
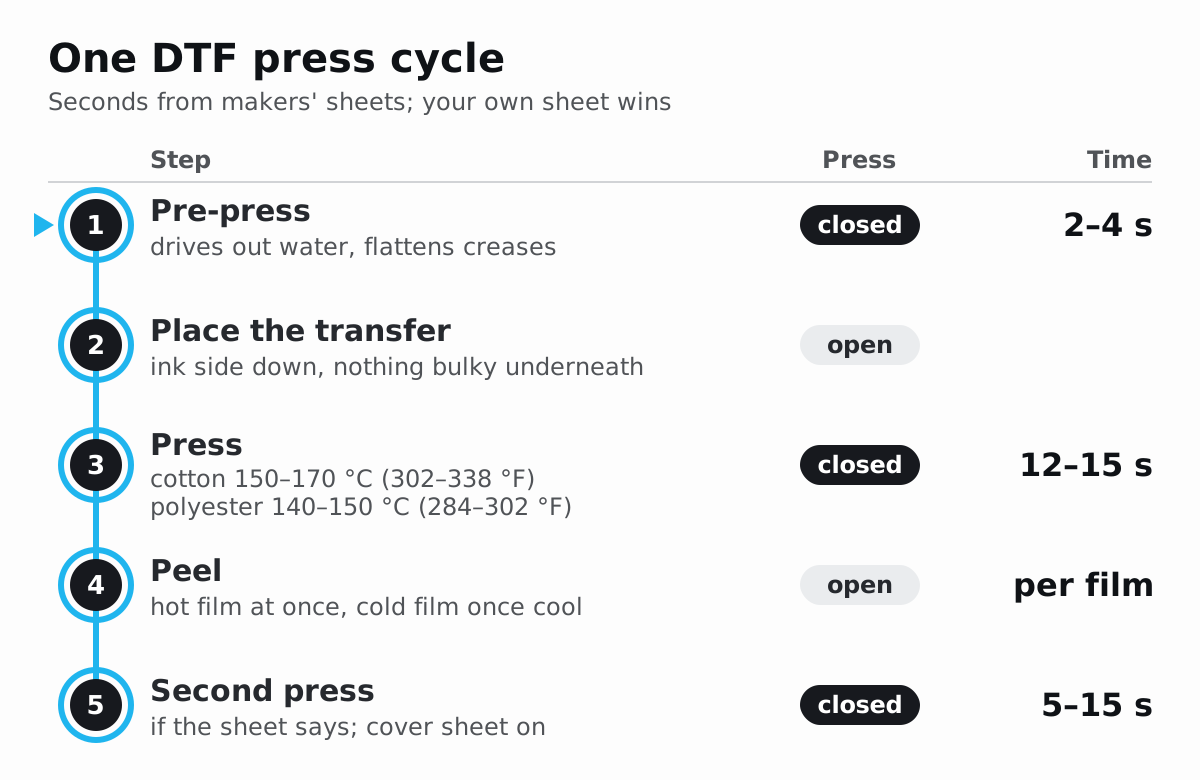
Usually yes. Geo Knight’s manual recommends pressing shirts for 2–4 seconds before transferring, to remove wrinkles and water. Water in the fabric spends the first seconds of the press turning to steam, and a crease holds the platen off the fabric beside it. Ninja is the exception in this set: it states that pre-pressing is not necessary for its transfers. Follow your transfer maker; where the sheet is silent, pre-press.
Before closing the press, also:
- keep collars, cuffs, zips and other bulky parts off the lower platen, as Geo Knight’s manual advises, or lift the print area on a pad;
- check that nothing loose (lint, a stray fibre, powder crumbs) sits under the film, since it will be bonded in place;
- when printing a second side, pull the garment over the lower platen so the first print hangs below it and is not re-heated, which Geo Knight also recommends.
The animated cycle below puts the whole sequence on one timeline.
Hot, warm or cold peel: what is the difference?
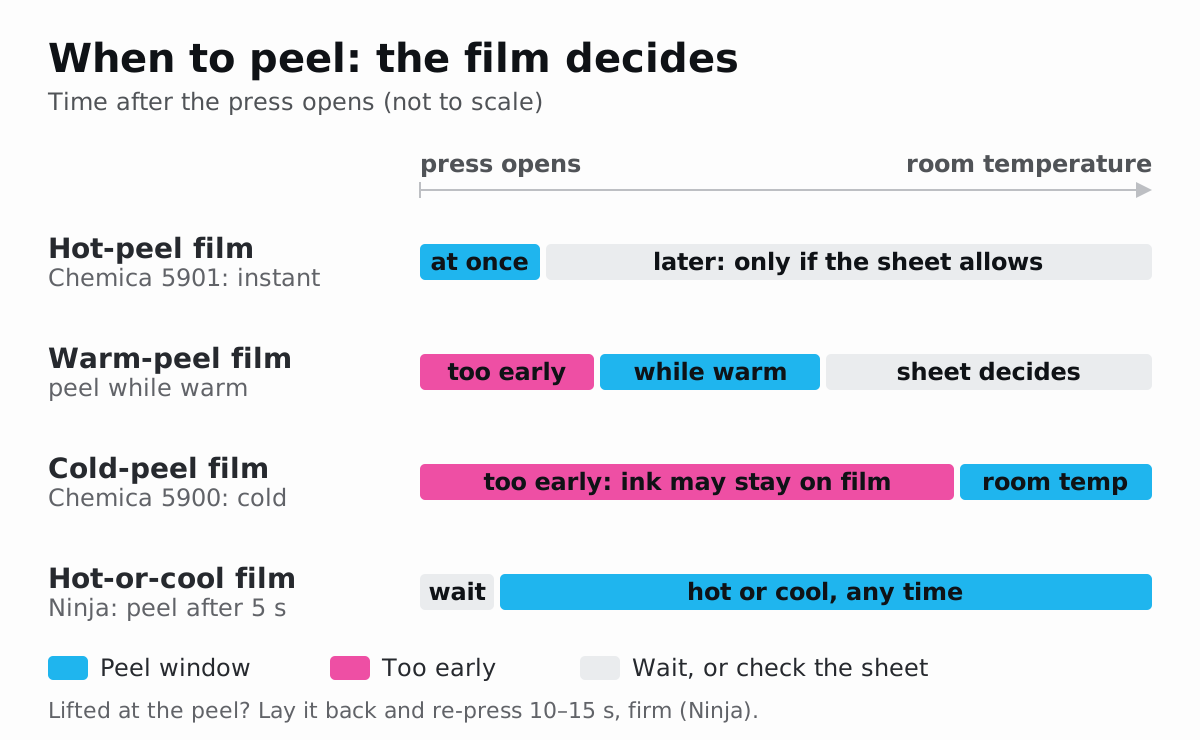
The peel is a property of the film, not a preference. Each film’s release coating is designed to let go of the ink within a particular temperature window, and by then the adhesive must hold the fabric more firmly than the coating holds the ink. Peel in the window the sheet names:
| Peel type | When to peel | Published example | If you peel at the wrong moment |
|---|---|---|---|
| Hot (instant) | As soon as the press opens, in one smooth pull | Chemica 5901 “instant”; STAHLS’ UltraColor MAX “hot” | The sheet says whether the film may also be peeled cold; if it only says hot or instant, peel at once |
| Warm | After a short wait, when the film is warm rather than hot | Films sold as warm-peel | Too early behaves like a cold-peel film peeled hot |
| Cold | When the film is back at room temperature | Chemica 5900 “cold”; Epson notes that some films need the garment to cool first | Peeled hot, ink can stay on the film or tear at fine edges |
| Either | Any time after the stated wait | Ninja: “Peel after 5 seconds, hot or cool” | The widest window; still wait the stated seconds |
What a wrong peel looks like: pieces of the image staying on the carrier, ragged edges on fine lines, or lettering lifting with the film. Stop as soon as you see it. Ninja’s instruction is to lay the film back down and press again with firm pressure for another 10–15 seconds. On a cold-peel film, then wait until the film is fully cool before trying again.
A print that needed a re-press has had its adhesive disturbed, so wash-test that batch before it ships. The peeling, cracking and washing guide follows these failures through to the first wash.
Do DTF transfers need a second press?
Only if your sheet calls for one or you want to change the finish. The makers split three ways:
- Epson adds a “fixing” press after peeling: 5 seconds at the transfer temperature and 4.2 N/cm², under silicone paper.
- Ninja calls its second press imperative: about 12 seconds under parchment paper or a single layer of T-shirt fabric, which it says “greatly improves durability and softness while reducing shine”.
- STAHLS’ instructions for UltraColor MAX describe a single hot-peel press with no cover sheet.
Across these sheets a second press runs 5–15 seconds at the transfer temperature. It reheats bare ink, so it always needs a cover sheet; Epson’s guide specifies a heat-resistant release sheet so that no ink touches the press. The cover’s surface becomes the print’s surface, which is how you choose the finish. SanMar’s post-press guide pairs them like this, at standard DTF temperature for 10–15 seconds:
| Cover sheet | Finish | Note |
|---|---|---|
| Parchment paper | Matte, softer hand | Let it cool before removing it |
| PTFE (Teflon) sheet | Slight sheen | Also smooths the print surface |
| Silicone sheet | Smooth semi-gloss | Glossier than parchment |
| Textured or embossed sheet | The sheet’s pattern | Test on a spare first |
Keep the second press inside the same temperature row as the first. A second press is extra heat: on dyed polyester it adds to the migration risk, so press it only when the sheet asks for it.
How do you check your heat press temperature and pressure?
A display shows what the controller’s sensor reads at one point, not what every part of the platen delivers. Geo Knight specifies the readout of its DK20SP as accurate to ±2 °F, and that is still one point. Check the surface itself, and check it whenever STAHLS’ two warning signs appear: sections of a transfer that will not adhere, or edges and lettering that pull up.
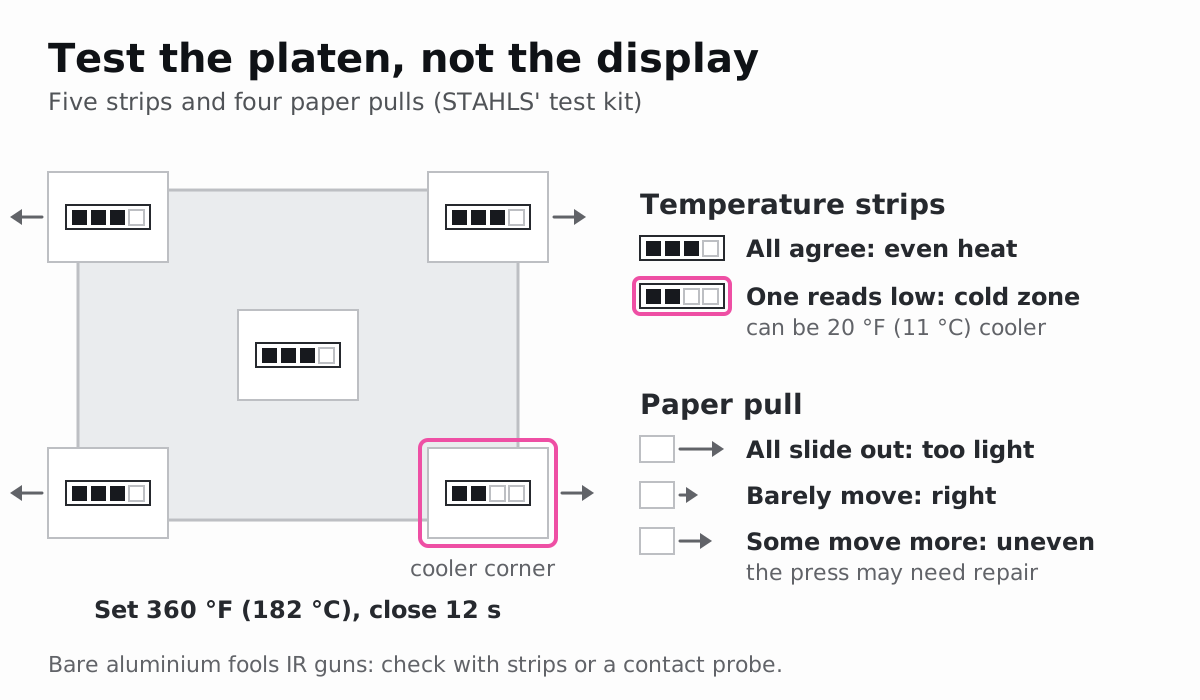
Temperature, with strips (STAHLS’ test-kit method):
- Heat the press to a set point and let it stabilise; STAHLS’ kit uses 360 °F (182 °C).
- Cut a sheet of paper into quarters and put one in each corner of the lower platen, plus a fifth sheet in the middle.
- Stick a temperature strip on each sheet, face down, so the paper lies between strip and upper platen.
- Press for 12 seconds.
- Read each strip. Strips that read differently show that the platen is not even; STAHLS’ warns that a low-quality press can run 20 °F (11 °C) cooler at the edges or between heating elements.
Temperature, with a contact probe: a surface probe with a thermocouple tip, pressed flat on the platen, reads the metal directly. Geo Knight sells one for exactly this and warns against infrared guns: on non-Teflon-coated aluminium platens, an IR reading 100–150 °F (56–83 °C) below the real temperature “is not uncommon”, because bare aluminium radiates heat poorly. Verify the platen with temperature strips or a contact surface probe; an infrared reading of pressed fabric is not a platen-temperature measurement.
Recovery under load: a platen loses heat to every cold garment. Geo Knight builds a drop alarm into its controller for presses that fall out of range “during excessive use”. Repeat one strip reading after a run of presses at your normal pace.
Pressure, with the paper-pull test: with quarter sheets of paper in each corner, lock the press and pull each one. If every piece slides out, pressure is too light. If they move a little or not at all, it is right. If some move more than others, the pressure is uneven and, in STAHLS’ words, the press “may need to be repaired”. Inspect the lower pad for cracks and the platen for warping first; STAHLS’ lists both among the causes of cold spots.
Run both checks on a new press, after changing a pad or platen, and whenever one area of the platen keeps failing. Write the results down with the date: a press that drifts slowly is easier to catch on paper than by eye.
What went wrong? Symptoms and the setting behind them
Most pressing faults trace back to one of four settings: temperature, time, pressure or peel timing. Start with the symptom, check the cheapest cause first and change one setting at a time.
| Symptom | Likely setting cause | Check first | Fix |
|---|---|---|---|
| Ink stays on the film or tears at the peel | Cold-peel film peeled too early; platen too cool; dwell too short | Peel type on the sheet; strip test | Re-press with firm pressure for 10–15 s, then peel in the right window |
| The same area fails on every garment | Cold spot or uneven pressure on the platen | Five-strip test; paper-pull test | Repair or replace the pad or platen; keep prints in the even zone meanwhile |
| Edges or lettering lift after the first wash | Light pressure at the edges, a seam under the print, an early peel | Paper-pull test in the corners | Firm, even pressure; a pad under seams; wait 24 hours before the first wash, as Chemica’s sheets say |
| Shiny halo or box around the design | Powder left outside the print melted onto the fabric; heat or pressure too high | The film before pressing | Shake off excess powder (Epson warns that stray powder can melt onto the garment); press at the sheet’s value |
| Scorched, glazed or yellowed fabric | Heat or pressure too high for the fabric | Fabric row; contact probe | Reduce pressure slightly, as Ninja’s scorch guide advises, then lower the heat in small steps |
| White turns pink, grey or tinted on polyester | Dye migration from the fabric | Is it dyed or sublimated polyester? | Low end of the polyester row; low-melt or blocker powder |
| Print cracks when stretched | Adhesive under-melted, or a non-stretch powder on spandex | Strip test; powder type | Reach the sheet’s temperature; use a flex powder |
| Print feels stiff and looks plasticky | No second press, a glossy cover sheet, or too much heat | The sheet’s second-press step | Second press under parchment, which Ninja says reduces shine |
How do you test settings on a new garment?
Five steps, each with a pass condition. Run them before the first paid job on any garment style you have not pressed before.
- Identify the fabric and pick a row. Read the fibre content on the label. Dyed polyester, nylon, elastane or a coating moves you to that row. Put a drop of water on an inside seam: if it beads instead of soaking in, treat the fabric as coated. Pass: you can name the row and the sheet you are following.
- Verify the press at that temperature. Run a strip test (all five points if the press is new to you) and the paper-pull test. Pass: the strips read the set point and no paper slides out.
- Press three small test transfers. Use the same garment style, an inside hem or an offcut. Press one at the sheet’s setting, one a 5 °C (9 °F) step lower and one a step higher within the row, with time, pressure and peel unchanged. Pass: note which of the three released cleanly.
- Peel exactly as the sheet says and inspect at once. Look for a clean release, sharp fine lines, no halo, and no scorch or shine on the fabric around the print. Pass: drop any setting that fails here.
- Confirm after a wash. Wait 24 hours, as Chemica’s sheets require before the first wash, then wash inside out at the care label’s temperature, dry, stretch and scratch the print, and compare it with an unwashed sample. On dyed polyester, look at the white again a day later; the dye-migration guide explains why. Pass: no lifting, cracking or tint. Record press, platen, film, powder, garment and all four settings so the next order starts from evidence.
The cheapest place for those test transfers is spare film on a production gang sheet. In NestSheet, add the test design as its own PNG, set its print size and one copy per setting you want to compare, then let Auto-nest pack the copies in with the order, or switch to Manual and place them at the end of the sheet where they are easy to cut off. The nesting guide shows both modes; the file-side checks for a new design (scale, transparency, white) are in the DTF test-file guide.
Sources
- Epson, DTF Film Printing Guide (CMP0437-00 EN): https://download.epson-europe.com/pub/download/6587/epson658728eu.pdf
- Chemica, DTF PET Film 5901 instant peel, technical datasheet: https://www.chemica.fr/en/plans?id_attachment=517
- Chemica, DTF PET Film 5900 cold peel, technical datasheet: https://www.chemica.fr/en/plans?id_attachment=494
- STAHLS’, UltraColor MAX DTF transfers, application instructions: https://www.stahls.com/ultracolor-max-transfers
- Hotronix, 360 IQ hat press application instructions: https://assets.stahls.com/stahls/content/pdf/flyers/360IQ-ApplicationChart.pdf
- STAHLS’, Heat press machine test kit, directions: https://assets.stahls.com/stahls/content/pdf/techsheets/Heat_Seal_Machine_Test_Kit.pdf
- Geo Knight, Digital Knight DK20SP operator’s manual: https://heatpress.net/pdf/dk20spman.pdf
- Geo Knight, DK20SP air-operated swing-away press, specifications: https://www.heatpress.com/products/digital-knight-air-operated-swinger
- Geo Knight, Digital pyrometer and surface probe kit: https://www.heatpress.com/products/digital-pyrometer-and-surface-probe-kit
- Ninja Transfers, Heat press instructions for DTF transfers: https://ninjatransfers.com/pages/heat-press-instructions-for-dtf-transfers
- Ninja Transfers, How to prevent scorch marks when pressing DTF transfers: https://ninjatransfers.com/pages/how-to-prevent-scorch-marks-when-pressing-dtf-transfers
- STS Inks, P-6 DTF transfer low-migration powder: https://www.stsinks.com/product/p-6-dtf-transfer-low-migration-powder/
- DTF Station, Color Prime Flex hot-melt powder: https://shop.dtfstation.com/products/color-prime-flex-hot-melt-powder-for-direct-to-film
- GRAPHICS PRO, How do I gauge light, medium and firm pressure when heat printing?: https://graphics-pro.com/education/how-do-i-gauge-light-medium-and-firm-pressure-when-heat-printing/
- SanMar, Finishing moves: exploring DTF post-press techniques: https://www.education.sanmar.com/decorator-relations/dtf-post-press-techniques/