DTF film has no partial opacity: each spot on it is either printed, powdered and transferred, or left bare. Semi-transparent pixels in a shadow, glow or feathered edge therefore print as solid ink on white, vanish, or break into dots, depending on how your prepress software or RIP converts alpha. Control the result in the artwork: threshold edges, halftone fades at final size.
| Soft element in the PNG | Typical alpha (0–255) | What a white-threshold workflow puts on film | What a dark garment shows | Fix before upload |
|---|---|---|---|---|
| Anti-aliased edge | 1–254 in a band about 1 px wide | White under most of the band, a colour tint on top | Nothing, once a 1 or 2 px choke trims it | Usually none; threshold at 128 for hard-edged graphics |
| Feathered edge | 255 falling to 0 across the feather | White almost to the end of the fade, paler tints on top | A pale rim around the design | Threshold it for a hard edge, or halftone the fade |
| Drop shadow | About 128 (50 %) at the core, falling to 0 | Grey ink on solid white | A grey patch with a hard outer edge | Delete it on dark garments; halftone it on light and coloured ones |
| Outer glow | The glow’s opacity falling to 0 | Solid white, or a pale tint on solid white | A hard-edged pale shape | Halftone it, or flatten it onto the garment colour and knock that out |
| Background-removal residue | Low values that look empty on screen | White wherever a speck passes the threshold | Dust, haze or a faint box | Delete or threshold it, then export again |
| Layer at reduced opacity | One flat value, such as 102 (40 %) | Solid white with a 40 % tint on top | A pale, opaque block | Use the tint colour at 100 % opacity, or halftone it |
The rows assume threshold handling: white under every pixel above a low alpha cut-off, with the colour printed as it looks over white. A choke then pulls that white in from the edges by a set number of pixels.
What is a semi-transparent pixel?
Every pixel in a transparent PNG stores a colour and an alpha value, its opacity. In the 8-bit files that design software exports, alpha runs from 0 to 255: the W3C PNG specification defines 0 as full transparency and the top value as full opacity, with everything between “partially transparent”. Opacity in per cent is alpha ÷ 255 × 100, so 50 % is alpha 128 (0.5 × 255 = 127.5, rounded up). PNG stores colour unmultiplied, so even a fully transparent pixel can keep a hidden colour that a later edit may reveal; the transparency glossary entry covers how to inspect it.
Soft pixels come from several sources:
- Anti-aliasing smooths curved and diagonal edges with partial alpha, in a band about one pixel wide on a crisp edge.
- Feathering, which GIMP’s manual describes as “a smooth transition between the selection and its surroundings”, set as a width in pixels. A 10 px feather at 300 pixels per inch (ppi) is 0.85 mm wide (10 × 25.4 ÷ 300).
- Drop shadows. GIMP’s Drop Shadow filter blurs the shadow with a Gaussian blur and sets its opacity to 0.5 by default, so the core sits near alpha 128.
- Glows, smoke, soft brushes, gradient fades and reduced layer opacity.
- Background removal, which often leaves faint specks or haze.
- Enlargement, which widens every soft edge; the DTF resolution guide shows a one-pixel edge from a 100 ppi source becoming 0.254 mm wide.
On screen, each pixel is composited over its backdrop. Over an opaque backdrop the W3C Compositing and Blending rule reduces to shown colour = colour × alpha + backdrop × (1 − alpha), alpha as a fraction, so a 50 % black pixel shows mid-grey on white and black on black. The file holds only “black, half opaque”; the backdrop arrives with the garment.
Why can’t DTF film print partial opacity?
Epson’s description of the DTF process sets out the layer stack. CMYK prints first and white second, mirrored on the film. While the ink is still wet, adhesive powder is spread over the entire printed design, the excess is shaken off, and the film is cured, pressed and peeled. On the shirt the order is reversed: fabric, adhesive, white ink, colour.
Two properties of that stack decide what happens to a soft pixel:
- Colour needs the white behind it. Cyan, magenta, yellow and black (CMYK) inks are translucent; the white printed behind them, the underbase, is what makes them visible on dark fabric. A dark-garment primer in Impressions magazine, written for direct-to-garment printing, puts it plainly: “To see the image at all, we must first apply a white base print and then add colors on top.”
- Every printed spot transfers as a solid piece. Powder sticks to the wet ink and cures with it into one adhesive-backed layer. Nothing lets the fabric show through half of a printed spot.
So a pixel that is 30 % opaque in the file has three possible outcomes. It prints solid, white plus colour, as opaque as a 100 % pixel. It prints nothing, and the garment shows. Or it becomes part of a pattern of solid dots with bare garment between them, which the eye averages to a lighter tone.
A RIP (raster image processor, the program that drives the printer) that prints “30 % white” takes the third route at the scale of single droplets, printing fewer or smaller ones. That is where soft DTF edges go wrong. Stahls’, which manufactures DTF transfers, quotes Dane Clement, president of Great Dane Graphics: “Images with soft edges do not reproduce well because the small dots/ink droplets that create the image are not able to adhere to the shirt. When there’s not enough surface for adhesive, you lose the edges of the design.”
Where the softness sits matters as much as how soft it is. Freestyle Transfers notes that gradients, glows, fades and shadows work in DTF except where they drop off to the substrate. A shadow falling on other parts of the design is already resolved: those pixels are opaque, with the darkening baked into their colour. Only the part of an effect that runs onto empty canvas carries partial alpha, such as the outer half of a drop shadow or the halo of a glow.
Threshold, RIP density or halftone: how can a soft pixel print?
Software between the design file and the printer turns each partial alpha value into one of those outcomes, in one of three ways.
An alpha threshold is a cut-off on the 0–255 scale: pixels above it get full white, pixels at or below it get none (see the alpha threshold glossary entry). The colour on that white is normally the pixel as it looks over white, so a fade becomes a hard-edged shape of ever paler tints, ending where the fade crosses the cut-off. Workflows place the cut-off very differently:
- At zero. CADlink’s Digital Factory RIP documents a setting for “whether to treat all semi-transparent color as opaque”.
- At a tolerance. Digital Factory’s Valid Pixel Tolerance exists “to avoid placing white underbasing under errant pixels, such as in the case of anti-aliasing”.
- At a fixed low value in prepress: the production export described below uses alpha above 15.
- Far higher in some transfer makers’ guidance: Freestyle Transfers says outer fades “will not print correctly below 60% opacity”.
A RIP density rule makes white follow opacity. Digital Factory’s Adaptive option uses “the opacity of the pixel … to determine the density of the white ink placed underneath for the underbase.” The RIP builds a 40 % white from fewer or smaller droplets, in a printer-scale pattern you cannot see in the file or control. These are the small droplets Clement warns about, so density-following white tends to give grainy shadows and speckled glows.
A halftone replaces the fade with solid dots whose size follows the tone. Every pixel in the halftoned area becomes alpha 0 or 255, so any threshold prints exactly what you drew, and you, not the RIP, choose the screen frequency in lines per inch (LPI) and the faintest dot.
| Method | Where it is decided | A 50 % black shadow becomes | What the garment shows | Main risk |
|---|---|---|---|---|
| Alpha threshold | Prepress software or RIP setting | Mid-grey ink on solid white | An opaque, hard-edged patch, paler than intended on dark fabric | Faint residue above the cut-off gets full white |
| RIP density (white follows opacity) | RIP setting | Grey ink on a scatter of white droplets | A speckled, grainy version of the fade | Isolated droplets with too little adhesive to bond |
| Halftone in the artwork | Design software, before export | Solid black dots covering 50 % of the area, bare film between | Fabric between solid dots, read by the eye as a fade | Dots too small for the film and powder to hold |
Use thresholds for edges, where the goal is a clean line, and halftones for effects, where the goal is a visible fade. Density rules are the hardest to predict, because the result depends on each queue’s screening, ink limits and curves.
Why do drop shadows print as grey patches on dark shirts?
Take a black drop shadow at 50 % opacity under a logo. On a white mockup it reads as a soft darkening. A threshold workflow prints it in three steps:
- White. Alpha 128 is far above any low cut-off, so the whole shadow gets full-strength white, out to the contour where the blur drops below the cut-off.
- Colour. The shadow is computed as it looks over white: 255 × (1 − 128 ÷ 255) = 127, so RGB 127, 127, 127, a mid-grey, then converted to CMYK. For black artwork the rule is simply 255 − alpha.
- Garment. Mid-grey ink on solid white lands on the shirt.
On a black shirt that is a grey patch lighter than the fabric: the shadow brightens the area it was meant to darken. On a red shirt it prints grey, not dark red. On a white shirt it looks close to the screen, but printed film now covers the whole shadow area and can show as a visible film edge.
The faint end behaves worst. With a cut-off as low as 15, alpha 16 still gets full white, and its colour is RGB 239, almost white, so the outer zone of the blur, meant to vanish, prints as the palest part of the patch. The result is a dirty shadow: pale, opaque and hard-edged.
What to do depends on the garment:
- Black and very dark garments: delete the shadow; the fabric already supplies the dark. For depth, use a hard offset shadow at 100 % opacity in a colour unlike the fabric, such as dark grey on black.
- Light, mid-tone and coloured garments: halftone it, so solid black dots darken the fabric between them (procedure below).
- Designs with their own background shape, such as a badge: keep the shadow inside it, flattened into opaque colour.
Why do glows turn into hard, pale shapes?
An outer glow is the reverse case: a light colour fading into transparency, designed on a dark mockup where it looks like light.
- A white glow at 30 % opacity (alpha 77) shows on a black screen as dark grey, RGB 77 by the compositing rule. On film it gets full white ink and no colour, because white flattened onto white needs none. The glow becomes one flat, opaque white shape: a bright blob with a hard edge.
- A coloured glow gets a pale tint of its colour on solid white. A magenta glow at 30 % prints as light pastel pink, far lighter than the dark, saturated glow on screen.
- With density-following white, the same glow prints as a speckled scatter of droplets: a grainy glow.
PNW Print Co lists “neon glow” first among the effects that “may not print well due to the white underbase”, especially on dark garments. Two fixes work:
- Halftone the glow. Transfer Superstars publishes this technique for a black T-shirt, using the Bitmap-mode steps in the halftone procedure below. The glow becomes solid dots of colour with fabric between them.
- Flatten it against the garment colour, then knock that colour out. When the design only ever goes onto one known colour, merge the glow into a solid layer of exactly that colour, so it becomes opaque colour fading into the shirt colour. Then apply a knockout, which deletes pixels within a tolerance of a chosen colour so the garment shows instead of ink. Halftone the remaining transition, or the knockout boundary prints as a hard line.
Where do white halos and fringes come from?
A white halo is white showing beyond the colour edge of a transfer. The first three causes below live in the file’s soft pixels; the fourth is white geometry and alignment:
| What you see | Cause | How to confirm it | Fix |
|---|---|---|---|
| A pale rim along every soft edge | Feathered, blurred or enlarged edges: partial alpha gets full white under paler tints | A grey band around the art in the alpha view | Threshold the edge, or halftone it if the softness is wanted |
| A thin white line hugging cut-out art | White matte: edge pixels still carry the white background the art was cut from | Near-white edge pixels over a black background | Matte-removal or defringe in the editor, then export again |
| Dust, haze or a faint rectangle | Background-removal residue with low, nonzero alpha | Specks over contrasting backgrounds | Delete or threshold the residue |
| An even border on clean, hard edges, or white on one side only | Underbase geometry, registration or scaling | The PNG edge is clean; the white separation or the print is not | Choke, queue scaling or printer alignment |
The last row is covered in the white-halo diagnosis guide. The first three are semi-transparency, and choke treats them differently.
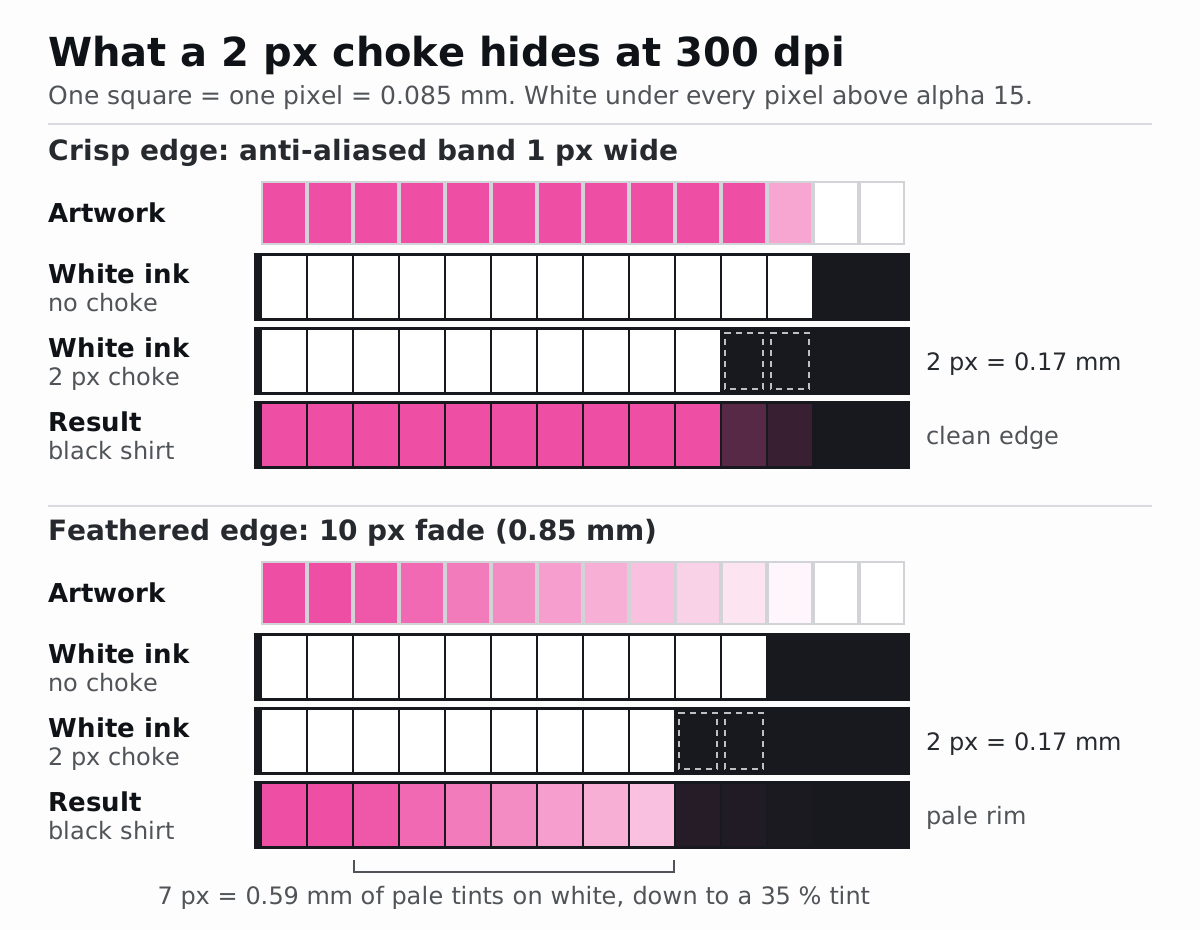
A choke pulls the white in so that the colour overhangs it slightly. At 300 dpi one pixel is 25.4 ÷ 300 = 0.085 mm, so a 2 px choke moves the white edge in by about 0.17 mm. That covers a crisp anti-aliased edge, whose soft band is about one pixel wide.
A feather is wider. In a 10 px fade (0.85 mm at 300 ppi), alpha falls from 242 to 13 across the ten pixels in even steps. With white under every pixel above 15, nine get white. A 2 px choke removes two, so white still sits under 7 px (0.59 mm) of the fade, the last of them at alpha 89, a 35 % tint. On a dark garment that strip of pale tints on solid white is the halo. An enlarged edge behaves the same way: the 0.254 mm edge from a 100 ppi source is 3 px at 300 dpi, of which a 2 px choke trims two.
A white matte fringe is different again. Its pixels mix the artwork colour with the old white background and print as near-white tints on solid white. Where they are near-white, a choke that protects white artwork, which needs its full white, leaves them untouched; the export described below protects every pixel with red, green and blue all at 250 or above. Remove the fringe in the artwork instead: Sumo Transfers, a DTF transfer printer, tells customers to use the “matte removal” or “defringe” option to eliminate halos left from colour blending.
How do you fix semi-transparency before upload?
Work on a copy of the approved artwork at final print size and 300 ppi. The goal: every pixel that meets the garment is fully opaque or fully transparent, unless you chose otherwise.
- Find every soft pixel. View the artwork over black, white and a saturated colour, then threshold a duplicate layer so every pixel above alpha 0 turns solid: that footprint is what a white-under-anything workflow prints. The transparent PNG guide covers this inspection in detail.
- Classify each soft area: an edge (clean it), an effect running onto empty canvas (halftone, flatten or delete it), residue (delete it) or a white matte (defringe it).
- Threshold the edges. In GIMP, Layer → Transparency → Threshold Alpha makes every pixel above the chosen value opaque and every other pixel transparent. In Photoshop, Layer → Layer Mask → From Transparency moves the alpha into a mask; apply Image → Adjustments → Threshold to the mask, then apply the mask.
- Halftone what should stay soft, or flatten it against a known garment colour as described for glows.
- Delete residue and padding, and export the PNG at its final size.
- Confirm. Reopen the exported PNG and repeat step 1. Apart from intended edges, the pixels above alpha 0 should be exactly those at 255, and nothing you did not draw should appear over black.
Which threshold value keeps the edge in place?
Use 128 (about 0.502 in GIMP’s 0–1 Threshold Alpha field) for anti-aliased edges. An edge pixel’s alpha roughly equals the share of the pixel the shape covers, so cutting at half keeps the hard edge on the original outline; lower values grow the shape and higher values shrink it, by up to half a pixel. On a feathered edge the choice moves the line much further: of the ten pixels in the 10 px fade above, a cut at 128 keeps 5 and a cut at 15 keeps 9, a difference of 4 px (0.34 mm).
How do you halftone a shadow or glow?
Halftone at final size and resolution, because scaling a halftone afterwards resamples every dot edge back into partial alpha. Stahls’ recommends hard edges or “a large halftone dot screen” for faded edges. Transfer Superstars’ published glow tutorial makes the dots in Photoshop’s Bitmap mode, and the same steps work for shadows:
- Put the effect alone on its own layer, at print size and 300 ppi.
- Make a greyscale version of its opacity: black where the effect is opaque, white where it is transparent.
- Shape the tones with Levels or Curves, clipping the faint tail so it disappears or starts at the faintest dot your film holds (table below).
- Convert with Image → Mode → Bitmap → Halftone Screen at an output of 300 pixels per inch, setting frequency, angle and dot shape; the tutorial uses 30–35 lines per inch.
- Convert the bitmap back to greyscale at size ratio 1, then to RGB without resizing. Select its black dots with feathering and anti-aliasing off, fill the selection with the effect colour at 100 % opacity on a new transparent layer, and delete the soft original.
- Check that the effect area now contains only alpha 0 and 255.
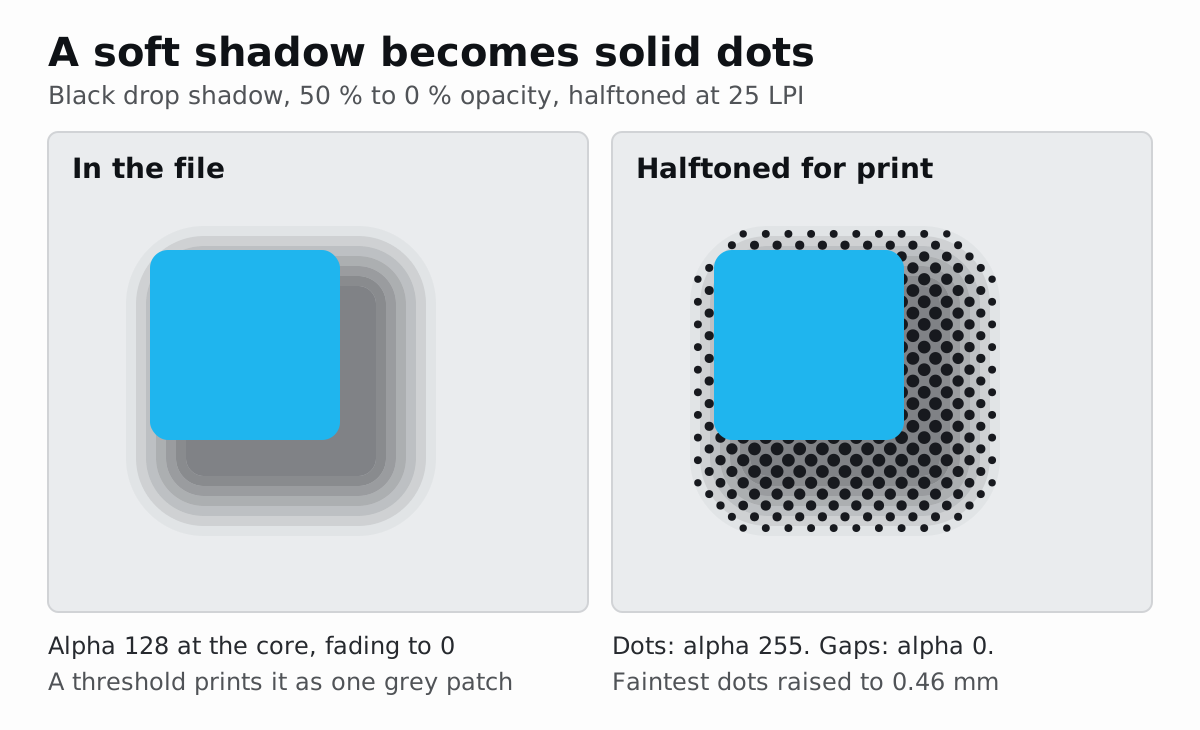
The DTF halftone guide covers choosing screen frequency and angle. For soft effects one extra check matters: the faint end of a fade makes the smallest dots. Freestyle Transfers asks for halftone dots over 0.018 in (1.3 pt, 0.46 mm, 5.4 px at 300 ppi) wherever an image drops off to the substrate. A round dot of diameter d in a screen of spacing s covers πd² ÷ (4s²) of its cell, so every screen has a faintest tone below which its dots fall under that minimum:
| Screen frequency | Dot spacing | Faintest tone with a 0.46 mm (0.018 in) dot | That tone as alpha | Tones fainter than that |
|---|---|---|---|---|
| 25 LPI | 1.02 mm (0.040 in) | 16 % | 41 | Clip to 0 % or raise to 16 % |
| 30 LPI | 0.85 mm (0.033 in) | 23 % | 59 | Clip to 0 % or raise to 23 % |
| 35 LPI | 0.73 mm (0.029 in) | 32 % | 82 | Clip to 0 % or raise to 32 % |
| 45 LPI | 0.56 mm (0.022 in) | 52 % | 133 | Half of a fade is lost; use a lower LPI for fades |
Spacing is 25.4 mm ÷ LPI: for 30 LPI, 0.85 mm, and π × 0.4572² ÷ (4 × 0.8467²) = 23 %. This is geometry only: ink spread changes the printed dot, and your film and powder may hold smaller dots than the guideline, so a test print decides. Halftone dots are also small, isolated shapes for the white choke, so compare choke settings on a sheet that includes your halftone, as in the small-detail choke test.
What does NestSheet’s Production DTF export do with partial alpha?
NestSheet generates the white channel from the alpha of the transparent PNG artwork, so the threshold question is answered in its export rather than in the RIP. The Production DTF preset writes a 300 dpi TIFF with CMYK and one white channel, W1, for MainTOP; mirroring is on by default and can be changed in the export window. For every design on the sheet:
- The artwork is first scaled to its printed size on the 300 dpi grid, so white is decided on the pixels that will print.
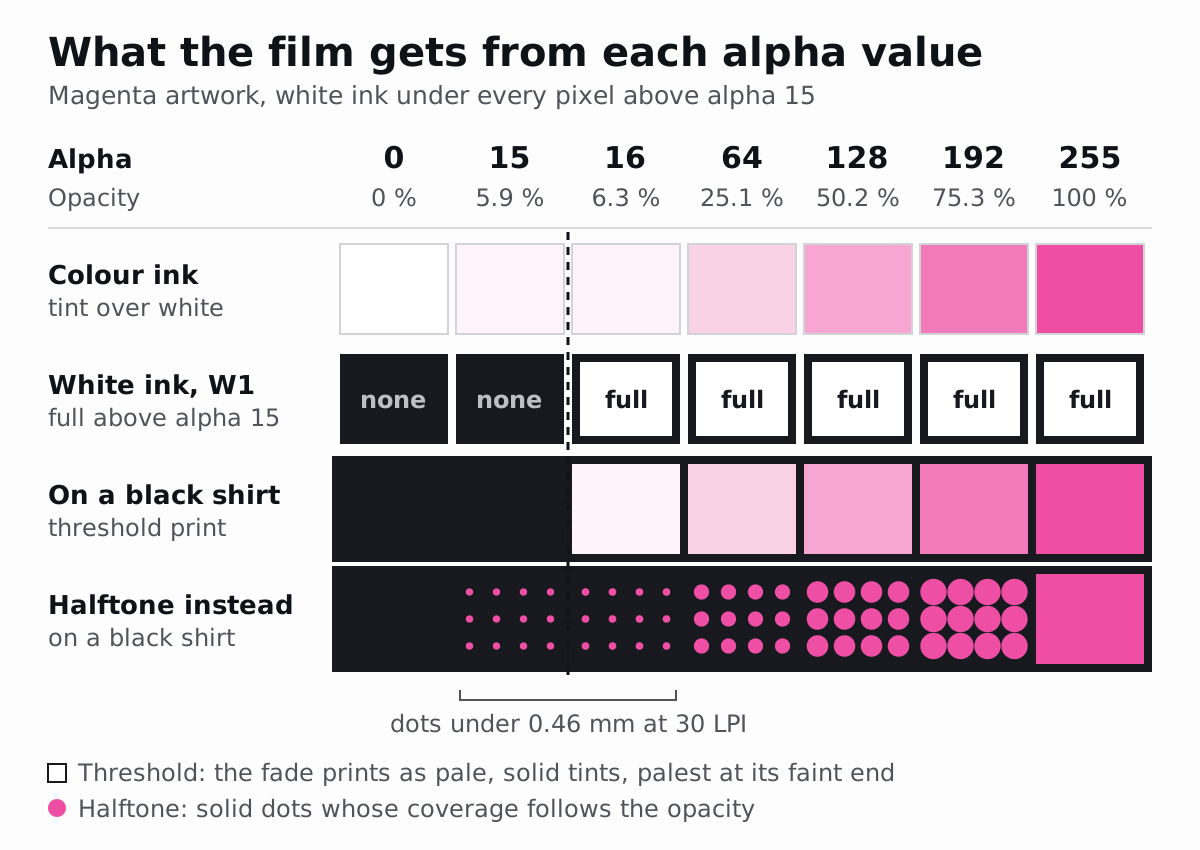
- White is all or nothing: every pixel with alpha above 15, from 16 (6.3 % opacity) up, gets full-strength white in W1; pixels at 15 or below (5.9 % and less) get none.
- Colour is the artwork flattened onto white, then converted to CMYK, so a partly transparent pixel prints as a lighter tint of its colour, on full white whenever its alpha is above 15.
- The whole-sheet choke of 0, 1 or 2 px, 2 px by default, then pulls the white in from the edges. Eligible lost details of at least 8 connected pixels at choke 2, or 6 at choke 1, get their white back; check small dots and lettering in the exported W1. Near-white pixels, with red, green and blue all at 250 or above, keep their full white.
Before choke, a black pixel at each alpha value produces:
| Alpha (0–255) | Opacity | White in W1 | Colour before CMYK conversion | Reads on black fabric as |
|---|---|---|---|---|
| 0 | 0 % | None | None (RGB 255) | The fabric |
| 15 | 5.9 % | None | A faint tint (RGB 240) with no white under it | The fabric, with a faint tint at most |
| 16 | 6.3 % | Full | RGB 239 on full white | Near-white |
| 64 | 25.1 % | Full | RGB 191 on full white | Light grey |
| 128 | 50.2 % | Full | RGB 127 on full white | Mid-grey |
| 192 | 75.3 % | Full | RGB 63 on full white | Dark grey |
| 255 | 100 % | Full | RGB 0 on full white | Black |
This is the drop-shadow case in numbers: a 50 % black shadow becomes mid-grey ink on solid white, a grey patch on a black shirt rather than a darkening. Exactly how grey it prints also depends on the RIP queue’s ink limits and curves.
Three more details matter for soft artwork:
- The upload trim finds each design’s bounds from pixels with alpha above 10, trimming only when that cuts more than 2 % of a side; faint specks far from the art enlarge the nested rectangle.
- A PNG without an alpha channel is treated as fully opaque, so its whole rectangle gets white; the preflight flags such pieces as having no transparency.
- The canvas White only view shows coverage before the export choke; inspect the final white in the W1 channel of the exported file.
Halftone, threshold, flatten or knock out soft effects in your design software, upload the finished PNG and check its W1 in the export.
This is the Production DTF preset; NestSheet’s PNG export keeps each pixel’s alpha as composed, so the RIP’s own threshold decides the white.
How do you test soft effects before a full run?
Before a soft design fills a gang sheet, print one small test strip through the production film, powder, RIP queue and press:
- An alpha ramp from 0 to 255, in black and in white.
- The design’s own shadow or glow, exactly as delivered.
- The same effect halftoned at two or three frequencies, such as 25, 30 and 35 LPI.
- A 10 px feathered edge beside the same edge thresholded at 128.
Press it onto the darkest and lightest garments the design will go on. Check where the ramp starts printing white, whether the faintest dots survived pressing and peeling, and whether the feathered edge shows a rim. Then wash it, because small dots can still lift; the guide to DTF peeling and cracking after washing sets out a wash test. Record the threshold, screen frequency and choke that pass.
For NestSheet sheets, the 0, 1 and 2 px choke comparison shows how to judge the exported white on your own edges and halftone dots.
Sources
- W3C, Portable Network Graphics (PNG) Specification, Third Edition, §6.2 Alpha representation: https://www.w3.org/TR/png-3/
- W3C, Compositing and Blending Level 1, §5.1 Simple alpha compositing: https://www.w3.org/TR/compositing-1/
- Epson, DTG and DTF printers for small businesses (DTF process steps): https://epson.com/dtg-dtf-printers-for-makers
- Impressions, Effective DTG printing on dark-colored garments: https://impressionsmagazine.com/digital-decorating/dtg/effective-dtg-printing-on-dark-colored-garments/
- CADlink Digital Factory, Layer tab (alpha channel options): https://help.cadlink.com/website/digital_factory/en/production/menus/layer_tab.htm
- Stahls’, Top 10 artwork tips for UltraColor MAX direct-to-film transfers: https://blog.stahls.com/top-10-artwork-tips-for-ultracolor-max-direct-to-film-transfers/
- Stahls’, Artwork tips for DTF transfers: https://blog.stahls.com/artwork-tips-for-dtf-transfers/
- Freestyle Transfers, Artwork guidelines: https://www.freestyletransfers.com/pages/artwork-guidelines
- PNW Print Co, DTF and UV DTF transfers: artwork requirements: https://www.pnwprintco.com/post/dtf-uv-dtf-transfers-artwork-requirements
- Transfer Superstars, How to create a glow effect DTF T-shirt: https://www.transfersuperstars.com/blogs/dtf-graphic-design/how-to-create-a-stunning-glow-effect-dtf-t-shirt
- Sumo Transfers, File prep for DTF: transparent PNG, white underbase and 300 dpi: https://sumotransfers.com/blogs/articles-1/file-prep-for-dtf-transparent-png-white-underbase-300-dpi
- GIMP Documentation, Threshold Alpha: https://docs.gimp.org/2.10/en/gimp-filter-threshold-alpha.html
- GIMP Documentation, Drop Shadow: https://docs.gimp.org/2.10/en/gimp-filter-drop-shadow.html
- GIMP Documentation, Feather: https://docs.gimp.org/2.10/en/gimp-selection-feather.html