DTF transfers peel when the adhesive never gripped the fabric: under-cured powder, too little heat or pressure, a water-repellent or softener finish, or a wash within 24 hours. They crack when the print is stiffer than the garment: heavy white ink, over-cured powder, solid blocks on stretch fabric. Fading is mostly hot washing, bleach and hot drying.
| When it fails | What it usually means | Check first |
|---|---|---|
| At the peel: ink stays on the film | Press short of heat, time or pressure; film peeled outside its window | Platen strip and paper-pull tests; the film’s peel type |
| First wash: whole print or patches lift | Adhesive never bonded: under-cured powder, a fabric finish, washed within 24 hours | A cured sheet’s surface; a drop of water on the garment |
| First washes: edges, lettering, fine lines | Weak bond at the perimeter: light pressure, seams, lines under 0.46 mm (0.018 in) | A fingernail along the edges; line widths at print size |
| When stretched, before any wash | Print stiffer than the fabric: heavy ink, large solids, non-stretch powder | Stretch a test piece as far as the garment stretches in wear |
| After many washes: hairline cracks, dull colour | Over-cured powder; hot washes and dryers; bleach | An unwashed piece from the same batch |
| Only on one garment style | The fabric: repellent, silicone, coating or dyed polyester | The same transfer on plain cotton beside it |
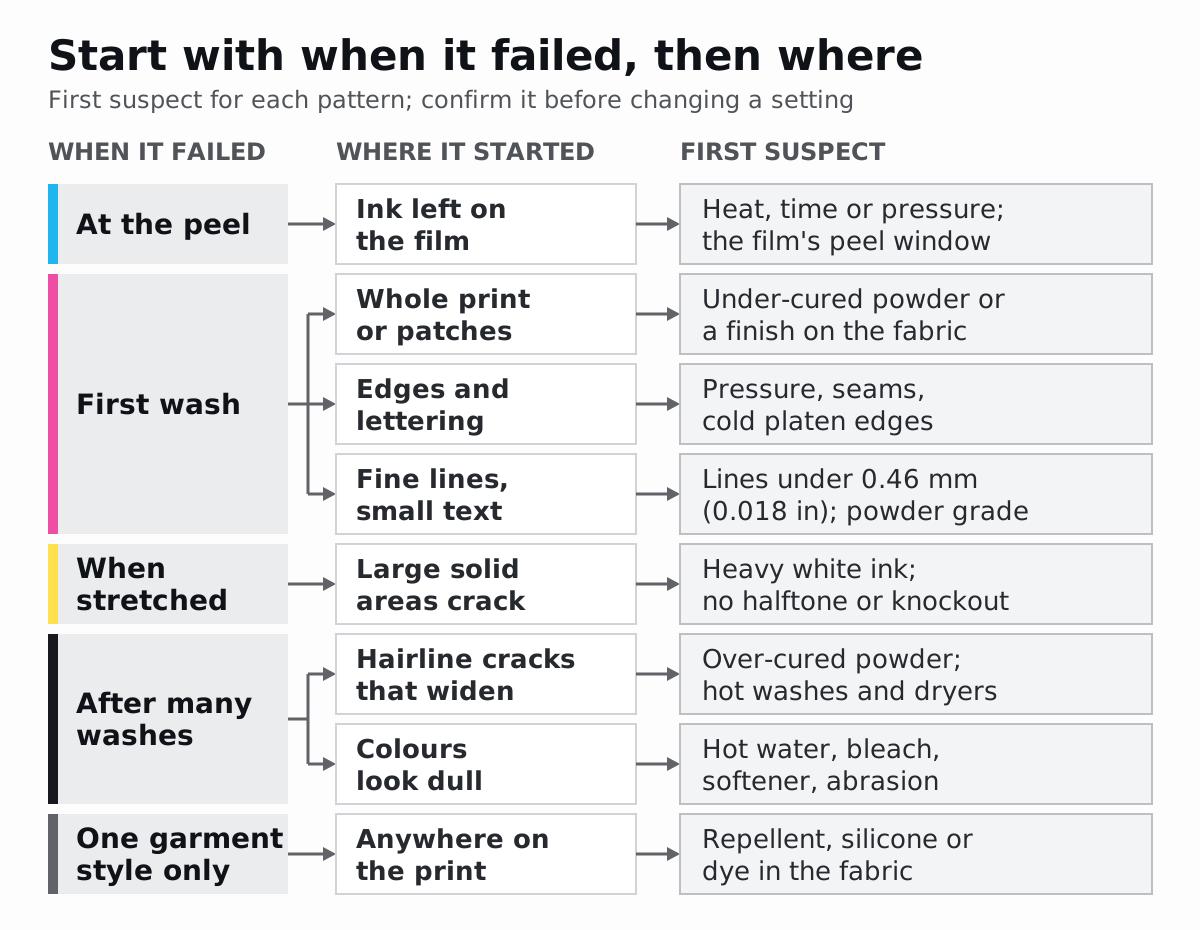
Find out when and where it failed before changing a setting; the flowchart and the full table below take each pattern to a cause, a fix and a test.
How do you work out why a DTF transfer failed?
Three questions narrow most failures to one or two causes. Answer them from the failed garment before touching the press, and keep an unwashed piece from the same batch as a control.
- When did it fail? At the peel, the transfer never bonded or the film let go at the wrong moment. In the first wash or two, the bond was weak from the start, typically from curing, pressing or the fabric. After many washes, the print bonded but was too stiff to keep flexing, or the care was harsh. On stretching, the print is stiffer than the fabric.
- Where did it start? Edges and lettering: the perimeter of the bond (pressure, seams, a cold platen edge). Fine lines and small text: line width, powder grade or missing white. The whole print or random patches: curing, powder coverage or the fabric. Large solid areas: ink load and stretch.
- Which garments? One style failing while others from the same sheet hold means the fabric. Every garment failing means the process.
INKBANK, a DTF ink maker, draws the same line: cracking means the print layer could not flex, peeling means the bond to the fabric gave way. The fixes differ, so keep the two apart.
Symptom, cause, fix and proof: the full table
Change one thing at a time; a cause is confirmed only when its test agrees.
| Symptom | Likely causes | Fix | How to confirm |
|---|---|---|---|
| Ink stays on the film at the peel | Too little heat, time or pressure; cold-peel film peeled hot; unpowdered patches | Re-press under parchment, peel in the film’s window; powder generously | Strip and paper-pull tests pass; a twin transfer peels cleanly after a verified press |
| Whole print or patches off in the first wash | Under-cured powder; repellent, silicone or softener finish; washed within 24 hours | Cure to an even orange peel; test or change the blank; wait 24 hours | Cured sheet grainy or powdery; water beads on the garment; the transfer holds on plain cotton |
| Edges and lettering lift on every garment | Light pressure; edges under-cured or short of powder | More pressure; even cure; powder to every edge | Corner papers slide out in the paper-pull test; a fingernail lifts the cooled edge |
| Edges lift in the same place every time | Cold spot or cracked pad; seam, collar or zip under the print | Use the even zone; pad under the print; replace the pad | Five-strip test finds the cold zone; the design holds when pressed in the centre |
| Fine lines and small text missing after washing | Lines under 0.46 mm (0.018 in); coarse powder; no white under the line | Lines of 0.46 mm or more at print size; finer powder | Widths measured at print size; each line visible in the exported white channel |
| Cracks when stretched, before any wash | Heavy white and colour ink; large solids; powder not made for stretch | Less white in the RIP; halftone or knockout; stretch-rated powder | The test piece cracks and a halftoned copy does not |
| Hairline cracks that widen with each wash | Over-cured powder; hot washes and dryers | Cure within the sheet’s range; 40 °C (104 °F) or colder, dry low or hang | Cured sheet glassy and cracks when bent; the unwashed control is intact |
| Shiny halo or box around the design | Stray powder melted onto the garment | Shake the bare film clean before curing | Grains on bare film under raking light |
| White tinted pink or grey on polyester | Dye migration from the fabric | Lowest temperature the powder allows; low-melt or blocker powder | A white test patch on the same garment tints too; check it at 24 and 72 hours |
| Colours dull after several washes | Hot water, bleach, softener, abrasion; white weak from the start | The care label below; shake the white ink, run a nozzle check | Beside the unwashed control; the film’s white looked weak before powdering |
What is a DTF transfer made of, and where does each failure start?
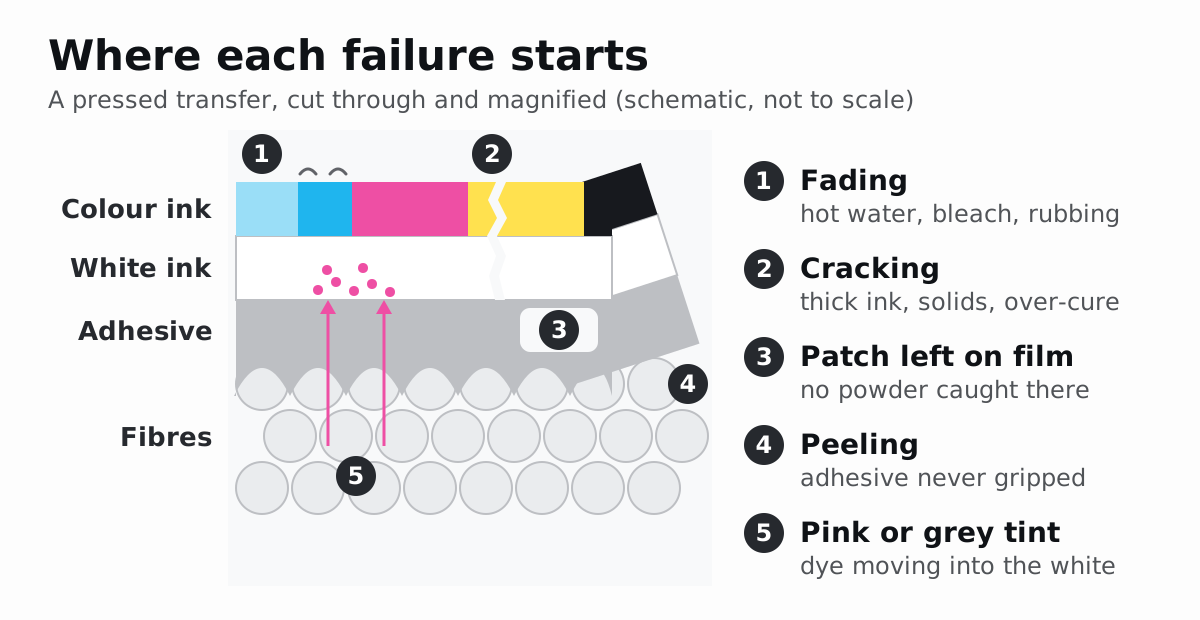
A DTF (direct-to-film) transfer is a thin laminate printed in reverse. Vastex, which makes DTF curing equipment, gives the order: the colour layer first, then the white base, then, while the ink is still wet, a powdered adhesive that must be heated to cure. On the garment the stack reverses: colour (CMYK) on top, white under it, adhesive under the white, fibres at the bottom.
Each failure starts at its own level:
- Adhesive to fibres: peeling, lifting edges, a print that slides off. The melted adhesive must flow into the fabric surface; too little heat, time or pressure, under-cured powder, a finish or steam from a damp garment stops it.
- Inside the ink layer: cracking, when thick ink, over-cured adhesive or large solids make the layer stiffer than the fabric.
- Ink to adhesive: patches that stay on the film because no powder caught there. Epson states that on its printers the powder will not stick to the film unless white ink is printed.
- Top surface: fading from hot water, detergent, bleach and abrasion.
- From below: dye from polyester fibres migrating up into the white.
Was the powder under-cured or over-cured?
Curing melts the adhesive powder onto the printed film before the transfer ever meets a garment, and Vastex calls “thorough and uniform curing” a critical step. Both faults show on the film, so inspect a cured sheet in raking light, a lamp held low to one side, before you press it. Haiyi, a DTF film maker, describes the three states:
| Cure state | The cured film looks and feels | On the garment |
|---|---|---|
| Under-cured | Matte, grainy or slightly powdery, with individual granules still visible | Looks fine on press day and fails at the first or second wash (Haiyi) |
| Correct | Smooth, with a slight sheen and a faint orange-peel texture (Haiyi); “glossy, orange peel” (Vastex) | Bonds and flexes with the fabric |
| Over-cured | Glassy and overly smooth, almost mirror-like, and stiff | Fine cracks along the lines where the garment bends most, widening with each wash (Haiyi) |
DTF Station, a powder maker, puts the feel simply: under-curing can leave the print sticky, over-curing makes it stiff. INKBANK adds that under-cured adhesive may feel bonded at the surface yet lack strength. Far above the range, Haiyi warns, the white loses opacity and the PET (polyester) film can curl; Vastex warns that ovens and presses “can burn your transfers” if they are left too long.
Do not borrow a curing number. Published settings run from Chemica’s 90 °C and 100 °C (194 °F and 212 °F) conveyor settings for its two films to Epson’s 170 °C (338 °F) for 150 seconds, a temperature Epson defines at the fixing surface rather than inside the oven. FOREVER caps ovens at 135 °C (275 °F) and infrared shakers at 110 °C (230 °F) for its film; DTF Station’s powder cures at 125–135 °C (257–275 °F). Epson adds that the right setting moves with the film, powder, curing device and amount of ink.
To check a cure:
- Cure one sheet at your powder or film sheet’s setting and your normal speed.
- In raking light, granules or a sandy, matte patch mean under-cured; a mirror finish means over-cured.
- Powder that rubs off under a fingertip is not cured.
- Adhesive that cracks when a cooled strip is bent is over-cured.
- Grainy edges on a sheet that is cured in the middle mean uneven heat, not a wrong setting.
Was there too much powder, too little, or the wrong grade?
The powder is the only glue in the system, and it bonds only where it landed.
- Too little. Epson recommends being generous, because the image “will not transfer well if some areas are not covered in powder”. INKBANK adds that too little powder creates weak zones, often where cracking or edge lifting begins. Before curing, tilt the powdered sheet under a light: every printed area, including the ends of thin lines, should look evenly frosted.
- Too much, or on bare film. Excess powder makes a heavier, plastic-like print, DTF Station notes. Epson warns that powder left outside the printed area may melt and stay on the garment: the shiny halo or box some prints carry. Shake the sheet until the bare film is clean.
- The wrong grade. Procolored, a DTF printer maker, sorts powders by particle size: fine, below 170 µm (micrometres), for a softer print; medium, below 200 µm, for ordinary T-shirts; coarse, below 250 µm, for rough surfaces such as bags and caps. A single 0.25 mm coarse grain is more than half as wide as the thinnest line STAHLS’ accepts, 0.46 mm (0.25 ÷ 0.46 = 0.54). Fine detail wants the finer grade, heavy and rough fabric the coarser.
- Damp powder. DTF Station specifies 40–60 % relative humidity for storing its powder and asks for it to be kept airtight and dry once opened. Close the bag or hopper at the end of every shift.
Was the transfer pressed and peeled correctly?
Press settings have their own guide by fabric: makers put cotton at 150–170 °C (302–338 °F) and polyester at 140–150 °C (284–302 °F), mostly 12–15 seconds at medium pressure, and the film decides the peel. For diagnosis, five faults matter:
- Too little heat, time or pressure. Ninja Transfers says film peeling “is almost always caused by not enough pressure or heat during the press”. INKBANK explains why: low temperature or short dwell leaves the adhesive under-activated, and low pressure stops it contacting the fabric evenly.
- Cold or soft spots. STAHLS’ says to test the press when sections of a transfer won’t adhere or edges and lettering pull up; a low-quality press set to 360 °F (182 °C) can run 20 °F (11 °C) cooler at the edges or between heating elements, and a cracked bottom pad is on its list of causes. The press guide’s five-strip and paper-pull tests find both.
- Seams, collars and zips hold the platen off the print beside them. Lift the print area on a pad.
- Moisture turns to steam during pressing, disturbs the adhesive’s flow and leaves weak areas (INKBANK). A short pre-press drives it out.
- The wrong peel moment. A cold-peel film pulled while hot can leave ink on the carrier; the press guide has the peel table.
Two tests isolate a press fault:
- Re-press. Cover a piece whose edges lifted with parchment and press it again at the sheet’s settings, as Ninja does at the end of every application “to fully bond the adhesive and prevent edge lift”. If it survives the next wash and an untreated twin does not, the first press was short.
- Peel-back. Lift a failed edge and look underneath with a loupe. A smooth, clean underside means the adhesive never wetted the fibres (heat, pressure, cure or a finish); fibres stuck to it mean the adhesive held and the fabric surface tore.
Can the fabric stop a DTF transfer from sticking?
Yes, and it is a fabric problem, not a press setting. A hot-melt adhesive bonds only where it can wet the surface: flow out and make intimate contact with it. 3M’s adhesives division explains with rain on a freshly waxed car: when a surface’s energy is lower than the liquid’s, the liquid beads instead of spreading, and an adhesive that beads makes a weaker bond. In 3M’s table of critical surface tension, a measure of how readily a surface is wetted, silicone scores 24 mN/m against 43 mN/m for polyester and nylon.
Three kinds of finish cause it:
- Water and stain repellents. Durable water-repellent (DWR) finishes sit on outerwear, and Cotton Incorporated notes that repellents also go onto general apparel such as casual trousers for stain resistance. Ninja warns that nylon with water-resistant treatments “may not allow the transfer to adhere properly”.
- Silicone softeners. Some blanks leave the mill with a silicone softening finish, and household softeners add a coating at every wash; Wacker, a silicone maker, says many of them “make fabric hydrophobic, causing laundry to repel water”. INKBANK lists softener, silicone finishes, water repellency and sizing as bond reducers.
- Coatings. A polyurethane or PVC coating puts plastic between adhesive and fibre; Ninja ranks vinyl and PVC-coated fabrics among the worst to heat-press.
A pre-wash or pre-press is unlikely to strip a durable repellent: Cotton Incorporated’s stain-repellent cotton twill still passed its repellency tests after 30 home launderings, and ironing helped regenerate the finish.
Three tests settle it:
- Water drop. Drip water on the print area itself. Drops that stay round point to a repellent or silicone finish; drops that soak in do not rule one out, because some silicone softeners increase absorbency, so confirm with the garment supplier and a transfer wash test. Laboratories measure the same property with the AATCC 22 spray test.
- Control press. Press the same transfer on plain cotton and on the suspect garment, wait 24 hours and wash both. If the cotton holds and the garment fails, the garment is the cause.
- Ask the blank’s maker whether the fabric carries a repellent or silicone finish; choose a blank without one, or quote only after a wash test on the exact garment passes.
A white that takes on the garment’s colour, pink on red polyester or grey on black, is a different fabric problem: dye migration, dye moving out of the fibres into the white ink. The guide to DTF on polyester and dye migration covers the mechanism, the low-temperature settings, blocker powders and the test.
Why do DTF prints crack on stretch fabric?
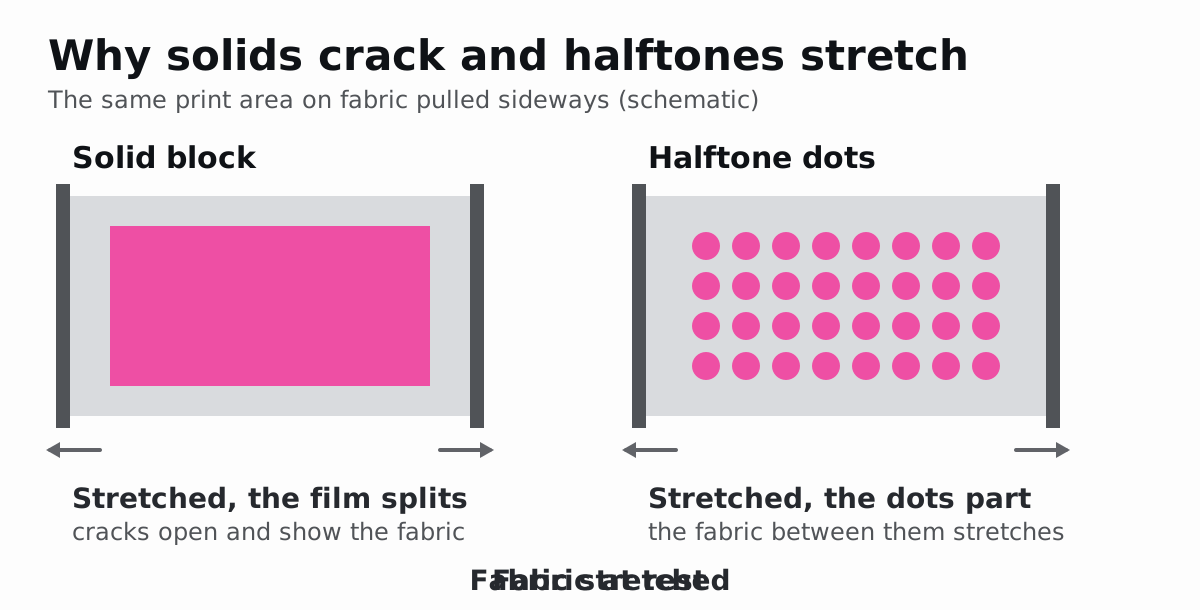
A print cracks when the garment stretches further than the ink layer can follow: jersey, rib and elastane give a lot, a solid film of ink very little. Three things decide how far the print can go:
- Ink load. INKBANK: a heavy white underbase improves opacity on dark garments but adds thickness and reduces flexibility, and excessive ink “traps more adhesive, increases cure demand, and can create a stiff print that cracks under stretch”. DTF Station tells printers to set RIP ink levels so the film is not overloaded, “especially for the white ink base layer”; Epson treats ink spreading past the image edge as the cue to lower the ink density.
- Large solids. A solid block is one continuous film with nowhere to give. A halftone (separate dots) or a knockout (a colour removed so the garment shows through) leaves open fabric to take the stretch. DTF Station credits halftones with “improving the flexibility of the print to prevent cracking”, and black knockout on dark shirts with a softer, more breathable print.
- Powder and cure. A powder sold for stretch fabrics flexes further; under-cured adhesive lacks strength and over-cured adhesive is stiff. The press settings guide covers stretch-rated powders.
To test, press a piece on the actual garment, let it cool and stretch it as far as the garment stretches in wear. Cracks only in the solids point to ink load; cracks through the whole print point to the powder or its cure.
Which artwork details fail first in the wash?
Four artwork features are worth checking whenever detail fails in the wash, and all four are fixed before the file reaches the printer.
- Hairlines. STAHLS’, which makes DTF transfers, asks for artwork lines of at least 0.018 in (0.457 mm) and warns that “smaller may not print”. At 300 ppi that line is 5.4 pixels wide (0.018 × 300). Thin lines also lose in the wash for a geometric reason: every point of a 0.46 mm line lies within 0.23 mm of an edge (0.46 ÷ 2), and lifting starts at edges. Thicken strokes at the final print size, not in a master that will be scaled down.
- Stray semi-transparent pixels. Faint pixels left by soft brushes, glows or background removal print as specks or a dusty haze around the design. One pixel at 300 ppi measures 0.085 mm (25.4 ÷ 300), less than half the 0.2 mm limit of a medium powder grain, so an isolated speck has little to hold adhesive with. Clean them up in the artwork; the guide to semi-transparent pixels, shadows and glows shows what prints and how to fix it.
- Large solids on stretch fabric. Halftone or knock them out, as above.
- White missing under fine detail. The adhesive sits on the white, and on Epson’s printers the powder does not stick at all without white ink. Check a fine line’s white in the print file itself, not in a preview.
In NestSheet, the production export applies the whole-sheet white choke you choose (0, 1 or 2 px, 2 px by default) to the W1 white channel and protects qualifying thin details, so fine lines keep their white. The White only view on the canvas shows coverage before that choke, so judge fine lines in the W1 channel of the exported TIFF; the choke test for small text compares the three settings on the same artwork.
How should customers wash DTF prints?
Film and transfer makers agree on the basics and differ mostly on drying. What four of them print on their own sheets (“not stated” means the sheet is silent):
| Instruction | Chemica film | FOREVER DTF Economy film | STAHLS’ UltraColor MAX | Ninja Transfers |
|---|---|---|---|---|
| First wash | After 24 hours | Not stated | Not stated | After at least 24 hours |
| Water | 40 °C (104 °F) | Up to 40 °C (104 °F) on a cold cycle, depending on powder and ink | Cold | Cold, gentle cycle, mild detergent |
| Inside out | Not stated | Yes | Not stated | Yes, to wash and to dry |
| Bleach | No | Not stated | Not stated | Avoid |
| Fabric softener | Not stated; “avoid the use of aggressive products” | No, nor liquid detergents | Not stated | Avoid |
| Drying | Tumble drying allowed | No tumble drying; hang or line dry | Tumble dry low or hang dry | Hang dry, or the lowest heat or permanent-press setting |
| Ironing | On the reverse | Inside out, or with baking paper over the print | Not stated | Not stated |
A care label that covers the main rules of all four:
Wait 24 hours before the first wash. Wash inside out on a cold, gentle cycle with a mild non-liquid detergent, following any stricter garment or transfer instructions. No bleach, no fabric softener. Hang to dry. Iron inside out, never on the print.
If your own film allows it, replace “hang to dry” with “tumble dry on low”; FOREVER also rules out liquid detergents for its film. Ninja explains the 24-hour wait as the time for the transfer to be “completely adhered” and the adhesive “fully cured and locked in”; INKBANK suggests 24–48 hours unless the supplier specifies otherwise.
Wash-life numbers are the makers’ own claims. STAHLS’ says UltraColor MAX transfers are “lab tested to withstand 50+ washes”; Ninja says its transfers are “tested to 100+ wash cycles”; DTF Station rates its own powder at 40–50 wash cycles at 60 °C (140 °F). None of those pages names the test method, so when a supplier quotes a count, ask which procedure, temperature and drying it used, and test your own garments.
How do you wash-test DTF transfers in the shop?
Three published methods are useful references. Know what each covers before borrowing from it:
| Reference | What it defines | What it does not give you |
|---|---|---|
| ISO 6330:2021 | Domestic washing and drying procedures for textile testing: 35 washing procedures for three reference machine types (16 front-loading, 12 top-loading agitator, 7 top-loading pulsator), six drying procedures, reference detergents and ballast; each washing procedure is one domestic wash | A pass mark; results are judged by the test method used with it |
| AATCC LP1 | Standard and alternate home-laundering conditions for an automatic washing machine | A result on its own; AATCC says it must be combined with a test method |
| AATCC TM61 | Accelerated colourfastness to laundering: one 45-minute test roughly approximates the colour loss and surface change of five typical home launderings | An adhesion or cracking test; it rates colour change |
A shop test borrows the discipline, not the certificate: the same machine, programme, detergent and load every time. It shows whether your process holds on your garments; it is not a certified test and does not support a claim of compliance with any standard. For that, send samples to an accredited textile laboratory and name the method. FOREVER’s instruction is the practical one: run print and wash tests on all materials before mass production.
- Make test pieces with production film, ink, powder, cure and press settings: a solid block, a ladder of lines from 0.3 to 1.0 mm, small text and one soft-edged element. Press three on the garment you sell and one on plain cotton, plus a fifth on the garment kept unwashed as the control. Label each inside with a laundry marker.
- Wait 24 hours, or longer if your film’s sheet says so.
- Test before washing. Run a fingernail along the edges, stretch each piece as far as the garment stretches in wear, and do INKBANK’s tape pull: press strong tape onto a corner and rip it off. Photograph every piece.
- Wash inside out at the temperature on the care label you will give customers, for example 40 °C (104 °F), with your usual detergent on a normal cycle, the machine filled to a normal load with other garments, as laboratory procedures do with ballast.
- Dry as the label says: hang, or tumble on low.
- Inspect after the 1st, 3rd, 5th and 10th washes, then every 10th up to the count you promise customers; that schedule is a shop choice, not taken from a standard. Check edges, the narrowest surviving line, solids after a gentle stretch, colour beside the control in daylight, and the white for tint.
- Record the wash number, place, defect and a photo each time.
- Pass or fail against criteria written before the first wash: no edge a fingernail can lift, no line of 0.46 mm or wider missing, no crack visible at arm’s length after stretching, no colour change visible beside the control.
- After a fix, change one variable and rerun the whole protocol with a fresh control.
Export the test sheet with the same preset as production and keep the TIFF with the wash record, so a repeat order starts from the file that passed; the Production DTF export page lists what that file contains, and the DTF test-file guide covers what to put on the target.
Sources
- Epson, DTF Film Printing Guide (CMP0437-00 EN): https://download.epson-europe.com/pub/download/6587/epson658728eu.pdf
- Vastex International, Curing of Direct-to-Film Adhesives: https://www.vastex.com/Articles/KK-0521_Curing_of_Direct-to-Film_Adhesives.php
- Foshan Haiyi Material Technology, What happens if DTF film is cured at too high a temperature?: https://www.haiyidtf.com/what-happens-if-dtf-film-is-cured-at-too-high-a-temperature/
- INKBANK, DTF prints crack or peel after washing: production troubleshooting guide: https://en.inkbank.com.cn/product-news/dtf-prints-crack-peel-after-washing.html
- DTF Station, Top 10 tips for softer DTF prints and Color Prime DTF transfer powder: https://dtfstationglobal.com/softer-dtf-prints-top-10-tips-for-a-luxurious-feel/ ; https://dtfstationglobal.com/product/dtf-transfer-powder/
- Chemica, DTF PET Film 5901 (instant peel) and 5900 (cold peel), technical datasheets: https://www.chemica.fr/en/plans?id_attachment=517 ; https://www.chemica.fr/en/plans?id_attachment=494
- FOREVER, DTF Economy: printing instructions (06.2026): https://www.forever-ots.com/wp-content/uploads/2026/06/DTF-Economy-EN.pdf
- STAHLS’, UltraColor MAX DTF transfers and Heat press machine test kit: https://www.stahls.com/ultracolor-max-transfers ; https://assets.stahls.com/stahls/content/pdf/techsheets/Heat_Seal_Machine_Test_Kit.pdf
- Ninja Transfers, FAQ and How to prevent scorch marks when pressing DTF transfers: https://ninjatransfers.com/a/faq ; https://ninjatransfers.com/pages/how-to-prevent-scorch-marks-when-pressing-dtf-transfers
- 3M Industrial Adhesives and Tapes Division, Innovations in Bonding to Low Surface Energy Surfaces: https://multimedia.3m.com/mws/media/755526O/innovations-in-bonding-to-low-surface-energy-white-paper.pdf
- Wacker Chemie, WACKER presents hydrophilic silicone active for household fabric softeners: https://www.wacker.com/cms/en-us/press-and-media/press/press-releases/2023/detail-222081.html
- Cotton Incorporated, Water and stain repellent finishing of cotton fabrics (ISP 1007): https://www.cottoninc.com/wp-content/uploads/2017/12/ISP-1007-Water-and-Stain-Repellent-Finishing-of-Cotton-Fabrics.pdf
- Procolored, 3 kinds of adhesive powder for DTF transfer: https://www.procolored.com/blogs/news/3-kinds-of-adhesive-powder-for-dtf-transfer
- ISO, ISO 6330:2021 Textiles: domestic washing and drying procedures for textile testing: https://www.iso.org/standard/75934.html
- AATCC, LP1 Home Laundering: Machine Washing and TM61 Test Method for Colorfastness to Laundering: Accelerated: https://members.aatcc.org/store/lp001/2212/ ; https://members.aatcc.org/store/tm61/495/