For DTF, supply artwork at 300 pixels per inch (ppi) at the final print size: a 10 in (25.4 cm) wide print needs 3,000 px across, whatever DPI the file’s metadata states. 200–250 ppi is acceptable for photos and soft-edged art seen from 45 cm (18 in) or more; text, thin lines and hard-edged logos need the full 300, and below 150 ppi pixel steps become visible.
| Effective PPI at final size | Pixel width | Pixels resolvable closer than | Use it for | Not enough for |
|---|---|---|---|---|
| 300 or more | 0.085 mm | 29 cm (11.5 in) | Everything, including small text, thin lines and left-chest logos inspected up close | — |
| 250 | 0.102 mm | 35 cm (13.8 in) | Photos, gradients, large lettering | Lines near a 0.46 mm (0.018 in) minimum width |
| 200 | 0.127 mm | 44 cm (17.2 in) | Photos and painterly art; front and back prints seen from 45 cm or more | Small text, hairlines, crisp logo edges |
| 150 | 0.169 mm | 58 cm (22.9 in) | Large back prints seen across a room, after a test print | Anything inspected up close, and any small text |
| Below 150 | over 0.169 mm | over 58 cm | Nothing at this size: print smaller or replace the source | — |
Pixel width is 25.4 mm ÷ PPI. The distance column uses the one-arcminute acuity of normal 6/6 (20/20) vision, explained in the sections below; hard edges show their steps from somewhat further away. Above 300–360 ppi, check whether extra resolution improves the intended print.
What is the difference between PPI and DPI?
PPI (pixels per inch) describes the image: how many of its pixels land in each inch of the print. DPI (dots per inch) describes the printer: how many ink-drop positions its print head can address per inch. They answer different questions. The PPI vs DPI glossary entry has the short definition.
Printer resolution belongs to the print mode. Mimaki’s TxF150-75 DTF printer, for example, lists printing resolutions of 720, 1,080 and 1,440 dpi, and Adobe puts most inkjet printers between 720 and 2,880 dpi while stressing that this “isn’t the same as image resolution”. The RIP (raster image processor, the software that drives the printer) turns every image pixel into a pattern of drops. At 300 ppi on a 1,440 dpi mode, each pixel spans 1,440 ÷ 300 = 4.8 drop positions in each direction; on a 720 dpi mode it spans 2.4. The printer uses those extra positions to build colour and tone inside each pixel. It cannot use them to show detail the file never contained, which is why a 1,440 dpi printer does not need a 1,440 ppi image.
In everyday use the labels blur. Photoshop calls the image setting Resolution and measures it in pixels per inch; DTF transfer makers’ artwork specs often say DPI. Stahls’, which manufactures DTF transfers, asks for raster art of at least 150 DPI at the requested size and recommends 300 DPI or better. When a supplier or customer asks for “300 DPI artwork”, read it as 300 ppi at the final print size.
| Number | What it counts | What sets it | Typical value in a DTF job |
|---|---|---|---|
| Effective image PPI | Source pixels per printed inch | The artwork’s pixels and the size you print it | 300 target, 150 floor |
| Printer DPI | Ink-drop positions per inch | The print mode chosen in the RIP | 720, 1,080 or 1,440 dpi on a Mimaki TxF150-75 |
| Metadata DPI | A number stored inside the file | Whichever program saved the file | Often 72, 96 or 300; it changes the stated size, never the detail |
Why is 300 ppi the target for DTF transfers?
Three kinds of evidence point to the same number.
Print references agree on it. Adobe describes 300 ppi as “the industry standard for producing high-quality prints”, notes that it looks sharp “especially when viewed up close”, and tells Photoshop users to set 300 PPI for the best print quality unless their printer requires a different value. Epson recommends an image resolution of 300 to 360 and adds that the right level depends on viewing conditions. Stahls’ recommends 300 or better for its DTF transfers.
It matches what the eye can resolve up close. Webvision’s chapter on visual acuity defines normal 6/6 (20/20) vision as resolving letter strokes that subtend one minute of arc. A 300 ppi pixel is 25.4 ÷ 300 = 0.085 mm wide and subtends one arcminute at 29 cm (11.5 in). Only someone looking from closer than that could pick out single pixels; from further away they are smaller than the eye can separate.
Edges are less forgiving than pictures. The eye detects a step or break in an edge that is finer than the detail it can resolve, a capacity vision scientists call hyperacuity. Text, outlines and logos are mostly edges, so their stair-steps appear at distances where the pixels inside a photo stay invisible. That is why lettering and hard-edged logos need the full 300 while photos tolerate less.
Choose resolution for the receiving print workflow. Epson warns that a resolution higher than needed creates a large print job that burdens the computer and takes “much longer to print than necessary”. For DTF, aim for 300 ppi at the final size and check the transfer printer’s artwork requirements.
When is 200–250 ppi enough, and when is 150 ppi too low?
Viewing distance and artwork type decide how far below 300 you can go. One minute of arc is 1/60 of a degree, and tan(1′) = 0.000291, so single pixels become resolvable closer than:
distance in inches = 1 ÷ (PPI × 0.000291) = 3,438 ÷ PPI
distance in cm     = 8,732 ÷ PPI
At 250 ppi that is 35 cm (13.8 in), at 200 ppi 44 cm (17.2 in), at 150 ppi 58 cm (22.9 in) and at 100 ppi 87 cm (34.4 in). Epson’s guidance says the same thing in words: from far away a slight loss of detail is not a big problem, but close-up viewing needs high resolution.
200–250 ppi is acceptable when all three of these hold:
- The artwork is photographic, painterly or distressed. Continuous tone and texture hide pixel steps, and Adobe states that “at least 220 pixels per inch (ppi) is usually sufficient” for high-quality photo prints on an inkjet printer.
- The print is large and will mostly be seen from 45 cm (18 in) or further.
- It contains no small lettering, hairlines or crisp logo edges.
Keep the full 300 ppi for:
- Lettering and thin lines. Stahls’ asks for lines of at least 0.018 in (0.457 mm). Such a line is 5.4 pixels wide at 300 ppi, 3.6 at 200 and only 2.7 at 150, where its soft edge pixels make up most of its width.
- Small prints that people inspect up close, such as left-chest logos, sleeves and labels.
- Artwork that carries its own halftone dots. Pixels per halftone cell equal PPI ÷ LPI, so halving the PPI halves the pixels that draw each dot. The halftone LPI guide covers the cell arithmetic.
Below 150 ppi, quality fails visibly. Each pixel is 0.169 mm or larger and resolvable within 58 cm; at 100 ppi it is 0.254 mm and resolvable within 87 cm (34.4 in). Curves and diagonals show stair-steps, lettering looks soft and thin lines thicken unevenly. Epson describes the result as “blurred or pixelated”, and 150 is the minimum Stahls’ accepts for raster art. Below it, print the design smaller or replace the source; do not ship it hoping the garment hides it.
How many pixels do you need for each print size?
Multiply the print width by the target PPI. In inches, pixels = width in inches × 300. In metric, divide by 2.54 first: pixels = width in cm ÷ 2.54 × 300, which is about 118.1 pixels per centimetre at 300 ppi. Do the same for the height: a 12 × 14 in print at 300 ppi needs 3,600 × 4,200 px.
The widths below follow the DTF transfer size chart by placement: left chest 3.5–4 in (8.9–10.2 cm), cap fronts 4–5 in, youth fronts 7–9 in, full fronts 10–12 in (25.4–30.5 cm) and full backs about 12 × 14 in (30.5 × 35.6 cm). Pixel counts are rounded to the nearest whole pixel.
| Print width | Metric | Typical placement | 300 ppi | 200 ppi | 150 ppi |
|---|---|---|---|---|---|
| 3.5 in | 8.9 cm | Left chest | 1,050 px | 700 px | 525 px |
| 4 in | 10.2 cm | Left chest, cap front | 1,200 px | 800 px | 600 px |
| 5 in | 12.7 cm | Cap front, widest | 1,500 px | 1,000 px | 750 px |
| 8 in | 20.3 cm | Youth front | 2,400 px | 1,600 px | 1,200 px |
| 10 in | 25.4 cm | Full front | 3,000 px | 2,000 px | 1,500 px |
| 11 in | 27.9 cm | Full front, most common | 3,300 px | 2,200 px | 1,650 px |
| 12 in | 30.5 cm | Full front or back, width | 3,600 px | 2,400 px | 1,800 px |
| 14 in | 35.6 cm | Full back, height | 4,200 px | 2,800 px | 2,100 px |
For metric orders, use these widths directly. Rounding to whole pixels moves the effective PPI by less than 0.2 at these sizes.
| Print width | Inches | 300 ppi | 200 ppi | 150 ppi |
|---|---|---|---|---|
| 9 cm | 3.54 in | 1,063 px | 709 px | 531 px |
| 10 cm | 3.94 in | 1,181 px | 787 px | 591 px |
| 25 cm | 9.84 in | 2,953 px | 1,969 px | 1,476 px |
| 28 cm | 11.02 in | 3,307 px | 2,205 px | 1,654 px |
| 30 cm | 11.81 in | 3,543 px | 2,362 px | 1,772 px |
| 35 cm | 13.78 in | 4,134 px | 2,756 px | 2,067 px |
The 150 ppi columns are a floor for large prints seen from a distance, not an alternative target.
How big can you print the file you already have?
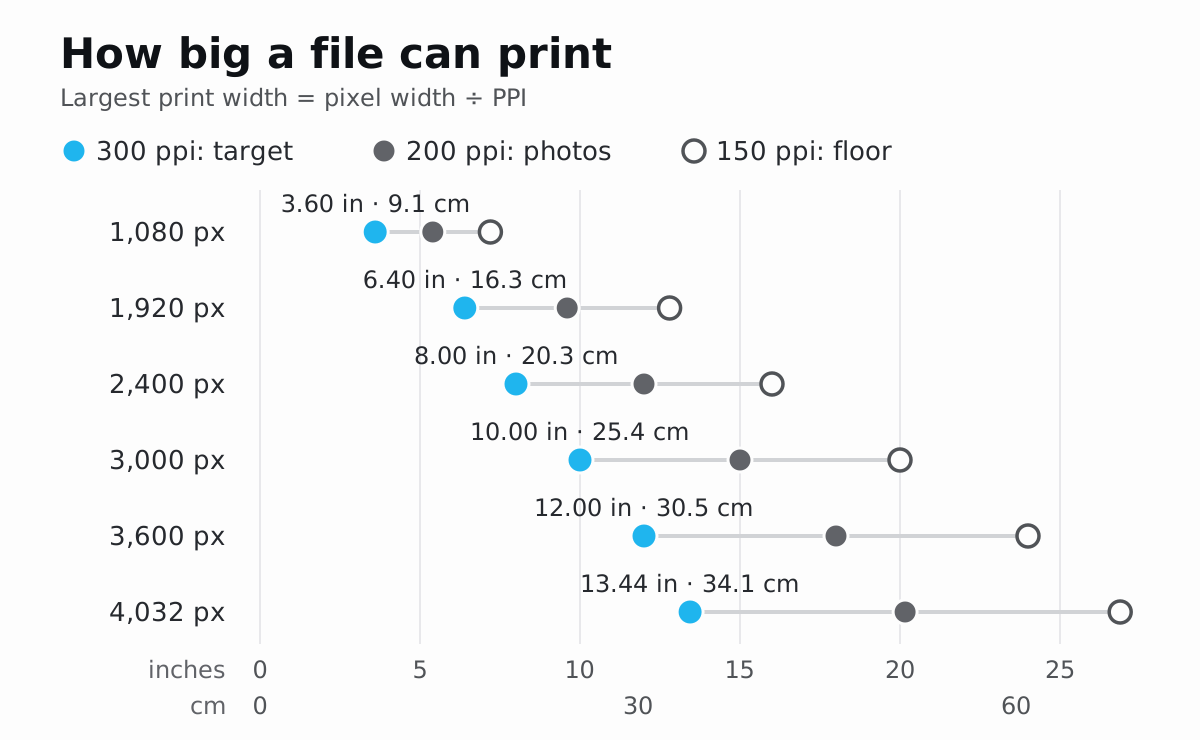
Run the same formula backwards: largest print width in inches = pixel width ÷ 300, then multiply by 2.54 for centimetres. The 200 and 150 ppi columns show how far the same pixels stretch when the conditions in the previous section allow it.
| Pixel width of the artwork | At 300 ppi | At 200 ppi | At 150 ppi |
|---|---|---|---|
| 1,080 px | 3.60 in (9.1 cm) | 5.40 in (13.7 cm) | 7.20 in (18.3 cm) |
| 1,920 px | 6.40 in (16.3 cm) | 9.60 in (24.4 cm) | 12.80 in (32.5 cm) |
| 2,400 px | 8.00 in (20.3 cm) | 12.00 in (30.5 cm) | 16.00 in (40.6 cm) |
| 3,000 px | 10.00 in (25.4 cm) | 15.00 in (38.1 cm) | 20.00 in (50.8 cm) |
| 3,600 px | 12.00 in (30.5 cm) | 18.00 in (45.7 cm) | 24.00 in (61.0 cm) |
| 4,032 px | 13.44 in (34.1 cm) | 20.16 in (51.2 cm) | 26.88 in (68.3 cm) |
| 4,500 px | 15.00 in (38.1 cm) | 22.50 in (57.2 cm) | 30.00 in (76.2 cm) |
Two rows deserve a comment. A 1,920 px wide screenshot, the width of a Full HD screen, covers a left chest at full quality but reaches only 6.40 in, well short of a 10 in full front. A 4,032 × 3,024 px frame, which is 12,192,768 pixels or about 12 megapixels, prints 13.44 × 10.08 in (34.1 × 25.6 cm) at 300 ppi: enough for a 12 in wide print without any enlargement.
Measure the artwork, not the canvas. Transparent padding counts towards the file’s pixel width but never prints. If a 3,000 px wide canvas holds artwork that is only 2,400 px wide, that artwork printed 10 in wide is at 240 ppi, not 300. Crop to the visible art before you do the arithmetic.
How do you calculate effective PPI?
Effective PPI is the number of source pixels per inch at the size the design is actually printed. It is the only resolution figure that predicts print quality:
effective PPI = pixel width ÷ printed width in inches
              = pixel width ÷ printed width in mm × 25.4
              = stated PPI ÷ enlargement factor
Worked examples:
- A 2,400 px wide logo printed 12 in wide: 2,400 ÷ 12 = 200 ppi. Printed 8 in wide, the same file gives 2,400 ÷ 8 = 300 ppi.
- A 2,953 px wide design printed 25 cm wide: 2,953 ÷ 250 mm × 25.4 = 300.0 ppi.
- A file saved at 300 ppi and enlarged to 150 % in a layout: 300 ÷ 1.5 = 200 ppi.
Check both axes. If a design is stretched more in one direction than the other, each axis has its own effective PPI and the lower one decides how the print looks. After a 90° rotation, the image’s pixel height runs across the printed width, so pair each pixel dimension with the edge it ends up on.
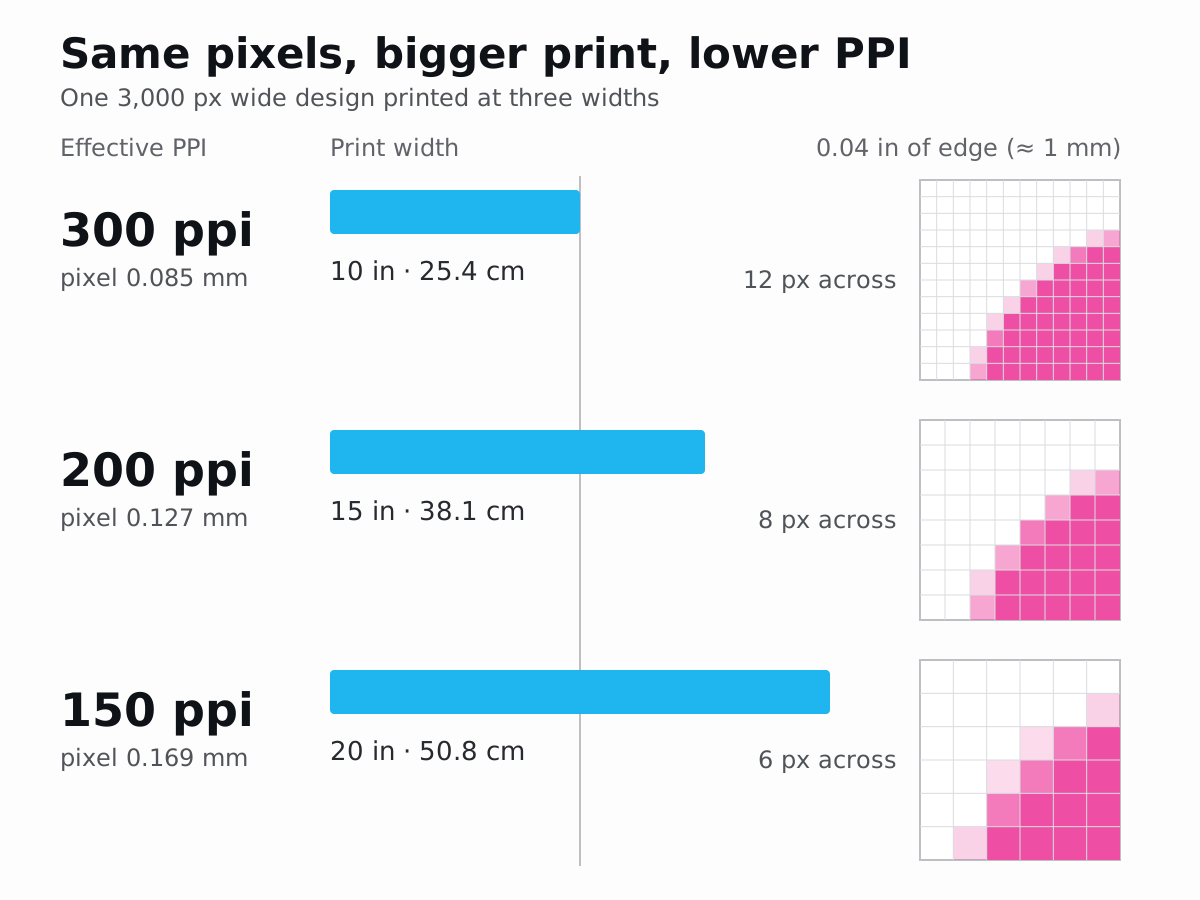
Effective PPI falls in proportion to enlargement. The same 3,000 px wide file gives 300 ppi at 10 in (25.4 cm), 200 ppi at 15 in (38.1 cm) and 150 ppi at 20 in (50.8 cm); each pixel grows from 0.085 mm to 0.127 mm to 0.169 mm, so the same 0.04 in (about 1 mm) of edge is drawn by 12, then 8, then 6 pixels.
Does changing the DPI number add detail?
No. The DPI value stored in a file is metadata: a suggestion about how large to print the pixels. Changing it without resampling leaves every pixel exactly as it was. GIMP’s manual says its Print Size command “does not change the number of pixels in the image and it does not resample the image”, and Adobe’s Photoshop guide tells you to deselect Resample “to maintain the current pixel dimensions” when you change print size or resolution.
Where the number lives depends on the format:
- PNG stores it in an optional
pHYschunk as pixels per metre, so 300 ppi is written as 11,811 pixels per metre and reads back as 299.9994. When the chunk is absent, the PNG specification leaves the physical pixel size unspecified, and every program falls back on its own default. - Camera files carry a resolution field too. The Exif standard tells cameras to write 72 when the real resolution is unknown, which is why so many phone photos report a nominal 72 however many pixels they hold.
Relabelling changes only the stated size. A 4,032 × 3,024 px photo labelled 72 ppi claims to be 56 × 42 in (142.2 × 106.7 cm); relabelled to 300 ppi, it claims 13.44 × 10.08 in (34.1 × 25.6 cm). The pixels, and therefore the detail, are identical. A file that “is 300 DPI” tells you nothing until you also know the size it will print at.
To set the label correctly when you prepare artwork:
- Photoshop: open Image › Image Size, untick Resample, type 300 in Resolution and read the Width and Height. That is the largest size at which the file delivers 300 ppi.
- GIMP: open Image › Print Size, enter 300 pixels per inch and read the resulting print width and height.
- Check: the pixel dimensions shown before and after must be identical. If they changed, Resample was on and the file was enlarged or reduced.
Can upscaling rescue a low-resolution file?
Resampling changes the number of pixels in an image; enlarging is called upsampling. The new pixels are calculated by interpolation from their neighbours. Nearest-neighbour interpolation copies the closest pixel, which keeps hard edges but enlarges every stair-step; bilinear and bicubic interpolation average several neighbours, which gives smooth transitions and softer edges. Adobe recommends Bicubic Smoother for enlargement and Nearest Neighbor for pixel art and sharp-edged graphics. The resampling glossary entry summarises the terms.
What interpolation cannot do is recover detail that was never captured. GIMP’s manual is blunt: when you enlarge, it “calculates the missing pixels by interpolation, but it does not add any new detail. The more you enlarge an image, the more blurred it becomes.” Enlarging a 1,080 px wide image to 3,000 px for a 10 in print multiplies the width by 2.78 and the pixel count by 7.7, while the information stays that of the 1,080 px original.
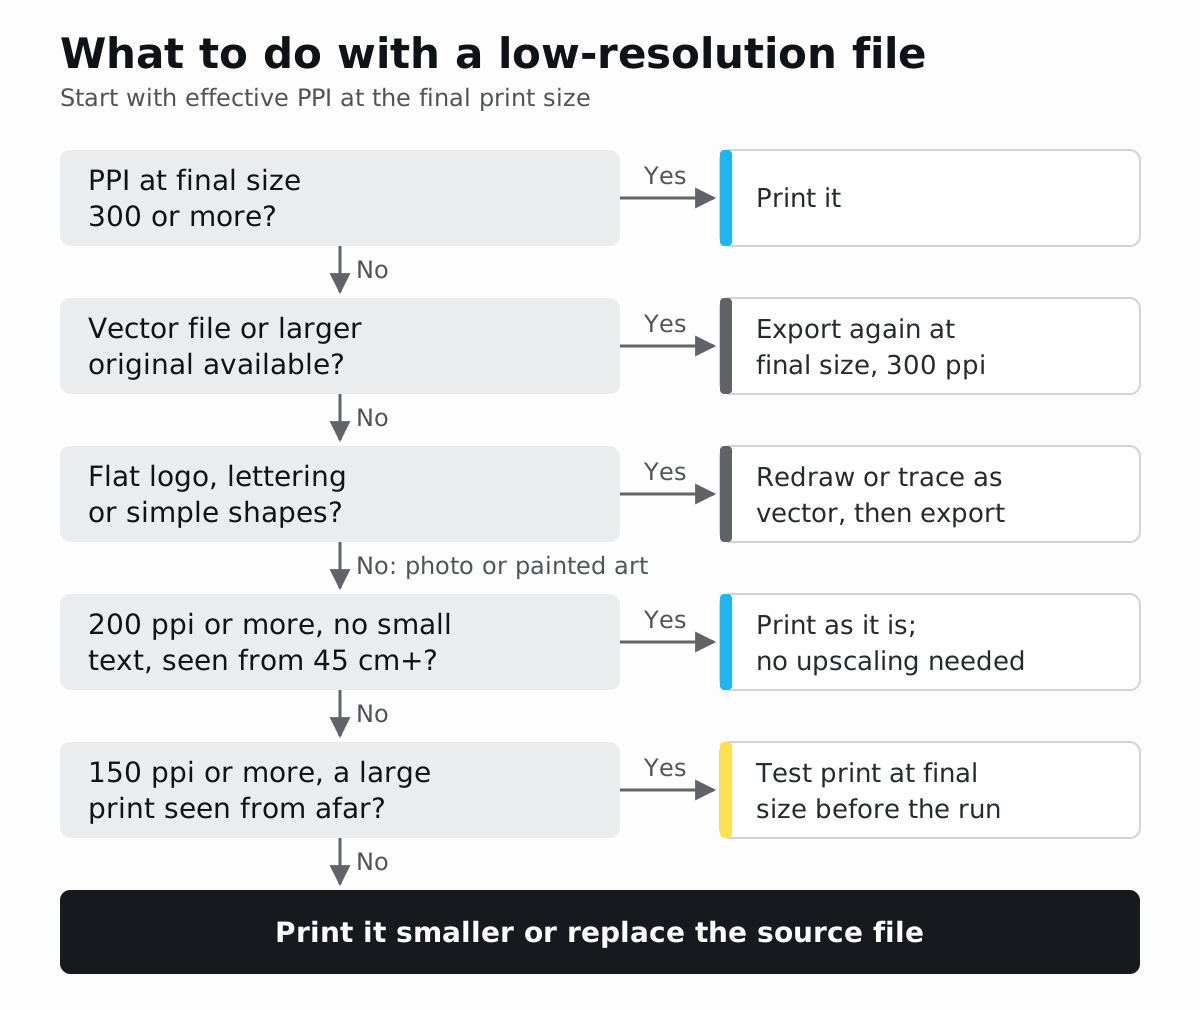
Whether enlargement is worth doing depends on what the artwork is:
- Flat logos, lettering and simple shapes: rebuild them as vector artwork rather than enlarging pixels. Redraw them, or trace them and correct the result: Inkscape’s own tutorial warns that a tracer is not meant “to reproduce an exact duplicate of the original image” and gives you curves to work from. Then export at the final size, as described in the next section.
- Pixel art and deliberately blocky graphics: enlarge by a whole-number factor (2×, 3×, 4×) with nearest-neighbour, so every source pixel becomes a crisp square.
- Photos already above about 200 ppi at the final size: print them as they are, or enlarge smoothly to 300 ppi if a supplier insists on the number; either way the photo gets no sharper.
- Photos between 150 and 200 ppi: use them only for large prints seen from a distance, and approve a test print at the final size first.
- Photos far below 150 ppi: no resampling method recovers faces, small text, fabric texture or distant signage the camera never resolved. Dedicated upscaling software can sharpen edges and add plausible texture, but every added detail is an estimate. Inspect faces, lettering and patterns at 100 % before approving, or ask for a better original.
Enlargement has a side effect specific to DTF. A one-pixel anti-aliased edge is 0.085 mm wide in a 300 ppi file but 0.254 mm wide in a 100 ppi source, and smooth enlargement keeps that soft band at the wider physical size. When the white underbase is generated from the alpha channel, partly transparent edge pixels can receive white too, which shows as a pale outline on dark garments. The guide to semi-transparent pixels explains how soft edges become white ink.
How should vector artwork be exported for DTF?
Vector artwork (SVG, EPS, Illustrator files, or PDF with vector content) is made of shapes rather than pixels, so it has no PPI until it is rasterised. Exported at the final size and 300 ppi, its edges are drawn fresh at full resolution, and Stahls’ lists vector as its preferred format.
- Set the document or artboard to the final print size in inches or centimetres.
- Export a PNG with a transparent background and set the resolution field (DPI or PPI) to 300.
- Check the exported pixel width: it must equal the print width × 300, for example 3,000 px for 10 in or 3,543 px for 30 cm.
- Reopen the PNG over a dark background at 100 % and inspect edges, thin strokes and the transparent background.
Watch the defaults. Inkscape’s PNG export resolution defaults to 96 dpi, so a 10 in wide design exported unchanged comes out 960 px wide, which is 96 ppi at its intended size; set 300 and the same export is 3,000 px. Vector files can also contain placed photos or raster effects such as shadows and textures with their own resolution. Exporting the whole file at 300 ppi does not improve an embedded 72 ppi photo, so check the effective PPI of every placed image as well.
How much memory does a large DTF file need?
Pixel counts grow with both width and height, so long sheets become large quickly. Use the same method as the guide to long gang sheets and RIP crashes:
decoded bytes = width px × height px × channels × bytes per sampleThe result is the size of the uncompressed pixel data. It is a lower bound, not peak memory: applications also hold previews, colour conversions and temporary copies. At 8 bits per channel a sample takes 1 byte; at 16 bits it takes 2. A 22 × 60 in sheet at 300 ppi is 6,600 × 18,000 px = 118,800,000 pixels, or 118.8 megapixels.
| Same 22 × 60 in sheet | Channels × bytes per sample | Decoded bytes | MB | MiB |
|---|---|---|---|---|
| 300 ppi, RGBA 8-bit (transparent artwork) | 4 × 1 | 475,200,000 | 475.2 | 453.2 |
| 300 ppi, RGBA 16-bit | 4 × 2 | 950,400,000 | 950.4 | 906.4 |
| 300 ppi, CMYK + W1 8-bit (five-channel production TIFF) | 5 × 1 | 594,000,000 | 594.0 | 566.5 |
| 200 ppi, CMYK + W1 8-bit | 5 × 1 | 264,000,000 | 264.0 | 251.8 |
| 150 ppi, CMYK + W1 8-bit | 5 × 1 | 148,500,000 | 148.5 | 141.6 |
MB and MiB are different units. NIST, following IEC 60027-2, defines 1 MB as 1,000,000 bytes and 1 MiB as 1,048,576 bytes. Some programs report mebibytes under a “MB” label, so the same raster can appear as 475.2 or 453.2.
Three conclusions follow from the table:
- Dropping from 300 to 200 ppi leaves (200 ÷ 300)² = 44.4 % of the bytes, and 150 ppi leaves 25.0 %. That saves memory by deleting detail, which the sections above show is acceptable only for some artwork.
- A single design is modest by comparison: a 12 × 14 in print at 300 ppi is 3,600 × 4,200 px, or 60.5 MB of RGBA data. The stored PNG can be much smaller, because its lossless compression packs flat colour far better than photographic texture, but the decoded size is fixed by the pixel count.
- For long sheets, splitting the order into shorter sheets keeps 300 ppi and reduces the memory each file needs. The same RIP guide explains how to test the receiving queue.
A resolution check before you nest the sheet
Run this check on every design before it goes onto a gang sheet. The DTF file requirements guide covers the transparency, colour and format checks that belong next to it.
- Record the final size of each design, width and height, in inches or centimetres.
- Read the pixel dimensions of the visible artwork, after cropping transparent padding.
- Calculate effective PPI for both axes, pixels ÷ inches or pixels ÷ mm × 25.4, and keep the lower value.
- Sort the result. 300 or more: go ahead. 200–299: accept photos and large prints seen from 45 cm or more; fix lettering and logos. 150–199: accept only large prints seen from a distance, after a test. Below 150: print smaller or replace the file.
- Fix at the source. Export vector art again at final size and 300 ppi, ask for the original photo, or redraw flat graphics. Changing the DPI label is not a fix.
- Look at it at print size. Photoshop’s View › Print Size shows an approximate printed size; also check at 100 % zoom over a dark background.
- Confirm with a test. Print the smallest lettering and the thinnest line at final size and inspect the edges from 30 cm. If they show steps, the file is not ready.
NestSheet sets each uploaded PNG’s starting print size from the resolution the file declares: trimmed pixel width ÷ dpi, so a 3,000 px design declared at 300 dpi starts 25.4 cm wide. A PNG that declares no resolution is treated as 300 dpi, and so is a PNG wider than 2,000 px that declares 96 dpi or less, the kind of nominal value cameras and design apps write by default. Each file’s ⋮ menu in the Files list shows its pixel size and dpi, and the panel for the selected design shows the DPI it will print at from its placed size, with advisory warnings below 200 and below 100 dpi.
When every design passes, the production export writes the whole sheet at 300 dpi; the 300 dpi CMYK + W1 export specification lists the details.
Sources
- Adobe, Resolution specs for printing images (Photoshop User Guide): https://helpx.adobe.com/photoshop/desktop/crop-resize-transform/resize-adjust-resolution/resolution-specs-for-printing-images.html
- Adobe, Printer resolution (Photoshop User Guide): https://helpx.adobe.com/photoshop/desktop/crop-resize-transform/resize-adjust-resolution/printer-resolution.html
- Adobe, Resampling options in Photoshop: https://helpx.adobe.com/photoshop/desktop/crop-resize-transform/resize-adjust-resolution/resampling-options.html
- Adobe, Change print dimensions and resolution (Photoshop User Guide): https://helpx.adobe.com/photoshop/desktop/crop-resize-transform/resize-adjust-resolution/change-print-dimensions-and-resolution.html
- Epson UK, What is the recommended resolution for output print size?: https://www.epson.co.uk/en_GB/faq/KA-01467
- Mimaki, TxF150-75 DTF printer specification: https://mimaki.com/product/inkjet/dtf/txf150-75/specification.html
- GIMP Documentation, Scale Image (GIMP 2.10 manual): https://docs.gimp.org/2.10/en/gimp-image-scale.html
- GIMP Documentation, Print Size (GIMP 2.10 manual): https://docs.gimp.org/2.10/en/gimp-image-print-size.html
- W3C, Portable Network Graphics (PNG) Specification, Third Edition, pHYs chunk: https://www.w3.org/TR/png-3/#11pHYs
- CIPA, Exif Version 2.32 (CIPA DC-X008-2019), XResolution: https://www.cipa.jp/std/documents/e/DC-X008-Translation-2019-E.pdf
- Inkscape, Command-line manual (export DPI default): https://inkscape.org/doc/inkscape-man.html
- Inkscape, Tutorial: Tracing bitmaps: https://inkscape.org/doc/tutorials/tracing/tutorial-tracing.html
- Stahls’, UltraColor MAX DTF transfers: artwork specifications: https://www.stahls.com/ultracolor-max-transfers
- Webvision (Kalloniatis and Luu), Visual acuity: https://www.webvision.pitt.edu/book/part-viii-psychophysics-of-vision/visual-acuity/
- NIST, Prefixes for binary multiples: https://physics.nist.gov/cuu/Units/binary.html